Connections
Overview
A Connection in this platform is a data integration pipeline that enables the platform to:
- Connect to external data sources (HTTP APIs, MQTT brokers)
- Send and receive data to and from other platforms
- Process and transform data through configurable workflows
Node Types
The platform supports various node types for building data processing workflows:
| Node Type | Purpose | Key Features | Use Cases |
|---|---|---|---|
| Extract | Data extraction from payloads | Source selection, JSON path configuration | Extract specific fields from incoming data |
| Loop | Array iteration and processing | Array validation, item processing | Process multiple items in arrays |
| Lookup | Reference data lookups | Lookup tables, ID mapping (internal to external) | Map external identifiers to internal IDs |
| Map | Data point mapping | Field mapping, data transformation | Map object keys with data points |
| Save | Global variable storage | Persistent variable storage | Save and reuse global variables |
| Split | String parsing and splitting | Configurable source and destination keys; outputs indexed parts (part1, part2, etc.) | Parse MQTT topics to extract structured data |
Key Features
1. Test Connection
The Test Connection feature enables you to verify that your connection to an external data source is working correctly before using it in production.
How It Works
- Configuration Validation: Checks that your connection settings (such as host, port, and authentication details) are correct
- Connectivity Check: Ensures the platform can reach the external data source over the network
- Authentication Test: Validates that your credentials and permissions are accepted by the external system
- Response Validation: Confirms that the external system responds as expected
What Users See
- Test Button: Each connection in the connections list includes a "Test" button
- Loading State: While the test is running, a loading indicator is shown
- Results Modal: After the test completes, a modal displays detailed results, including:
- Connection status (success or failure)
- Response data from the external system
- Any error messages if the test fails
- Response headers and timing information
This feature helps you quickly identify and resolve configuration or connectivity issues before integrating the connection into your workflows.
2. Export Policy
The Export Policy feature allows users to save their entire data processing workflow—including all node configurations and connections—for backup and sharing purposes.
What is Exported?
- Node Configurations: All settings for each node type (Extract, Loop, Lookup, Map, Save)
- Node Connections: The links and relationships between nodes in the workflow
- Node Positions: The visual layout and coordinates of each node on the workflow canvas
- Entry Point: The node where processing begins
- Adjacency List: The complete graph structure representing the workflow
Export Options
- Copy as JSON: You can easily copy your workflow as a structured, human-readable JSON object to your clipboard for sharing or pasting elsewhere
This feature makes it simple to back up, restore, or share your workflow with others.
3. Import Policy
The Import Policy feature allows users to import their entire data processing workflow—including all node configurations. This is useful for restoring a workflow from a backup or sharing with others.
What is Imported?
- Node Configurations: All settings for each node type (Extract, Loop, Lookup, Map, Save)
- Node Connections: The links and relationships between nodes in the workflow
- Node Positions: The visual layout and coordinates of each node on the workflow canvas
- Entry Point: The node where processing begins
- Adjacency List: The complete graph structure representing the workflow
Import Options
- Paste from Clipboard: You can easily paste your workflow from your clipboard
4. Run/Test Policy
The Run/Test Policy feature enables users to simulate and validate their data processing policy to see how it will perform in production.
Purpose
- Allows users to test their entire policy with sample payloads and headers
How It Works
- Sample Data: The test uses the payload and headers obtained from the connection
- Workflow Execution: Executes the full sequence of nodes in your workflow
- Result Preview: On hover over a node, you can see the result of that node
What Users See
- Run Button: Located in the workflow, allowing you to start the test
- Node-by-Node Results: For each node, both the input and output data are displayed
Testing Process
- Data Preparation: Loads the payload and headers
- Sequential Processing: Executes each node in order, passing data along the workflow
- Data Flow Visualization: Illustrates how data moves and changes between nodes
5. Policy Management
The Policy Management system provides robust tools for handling the lifecycle of your workflows. The main features include:
Save Policy
- Purpose: Permanently save the current workflow configuration
- Process: Stores the complete node graph, settings, and all related metadata
- Integration: Associates the saved policy with its corresponding connection
- Persistence: Ensures the workflow is available for production use and future editing
Update Policy
- Purpose: Modify and enhance existing workflows as requirements evolve
- Process: Updates the stored configuration with new changes
Clear Policy
- Purpose: Clear the current workflow configuration and reset it for new changes
These management features help maintain a clean, organized, and reliable workflow environment.
Connection Types and Configuration
The platform supports multiple connection types, each with specific configuration options:
MQTT Connection Configuration
In short: Lightweight pub/sub messaging, great for IoT and real-time data.
Basic Information
- Connection Name*: A descriptive name for your MQTT connection
- Connection Type*: Select "MQTT" from the dropdown
- Is Draft: Checkbox to save as draft (optional)
MQTT Configuration Fields
| Field | Description |
|---|---|
| Host | MQTT broker hostname or IP address |
| Port | MQTT broker port number |
| Client ID | Unique identifier for this MQTT client |
| Username | Authentication username |
| Password | Authentication password |
| Topic | Default topic for publishing/subscribing |
| QoS Level | Quality of Service level (0, 1, or 2) |
| Payload (Base64) | Base64 encoded payload for testing |
| Clean Session | Start with a clean session |
| Retained | Retain messages on the broker |
MQTT Subscriptions
- Topic: MQTT topic to subscribe to
- QoS: Quality of Service level for the subscription
- Add Subscription: Button to add multiple topic subscriptions
HTTP Connection Configuration
In short: Standard request–response API calls over HTTP/HTTPS.
Basic Information
- Connection Name*: A descriptive name for your HTTP connection
- Connection Type*: Select "HTTP" from the dropdown
- Is Draft: Checkbox to save as draft (optional)
HTTP Configuration Fields
| Field | Description |
|---|---|
| Host | HTTP server hostname or IP address |
| Port | HTTP server port number |
| Scheme | Protocol scheme (HTTP/HTTPS) |
| Path | API endpoint path |
| Method | HTTP request method |
| Payload | Request body data (for POST/PUT requests) |
HTTP Headers
- Header Name: Custom header name (e.g., Content-Type, Authorization)
- Header Value: Header value (e.g., application/json, Bearer token)
- Add Header: Button to add multiple custom headers
- Default Headers: Accept and Content-Type headers are pre-configured
Advanced Configuration Options
Advanced Configuration
- Timeout: Connection timeout in seconds (default: 30)
- Priority: Connection priority level (default: Normal)
- Tick Interval: Health check interval (default: 120s)
Retry Configuration
- Multiplier*: Exponential backoff multiplier (default: 2)
- Max Backoff*: Maximum backoff time (default: 30s)
- Min Backoff*: Minimum backoff time (default: 1s)
- Max Attempts*: Maximum retry attempts (default: 3)
Options Configuration
- Debug: Enable debug logging (optional)
- Compression: Data compression method (default: Gzip)
- MQTT: Best for IoT devices, real-time messaging, and lightweight communication
- HTTP: Ideal for REST API integration, web services, and standard web communication :::
Creating a New Connection
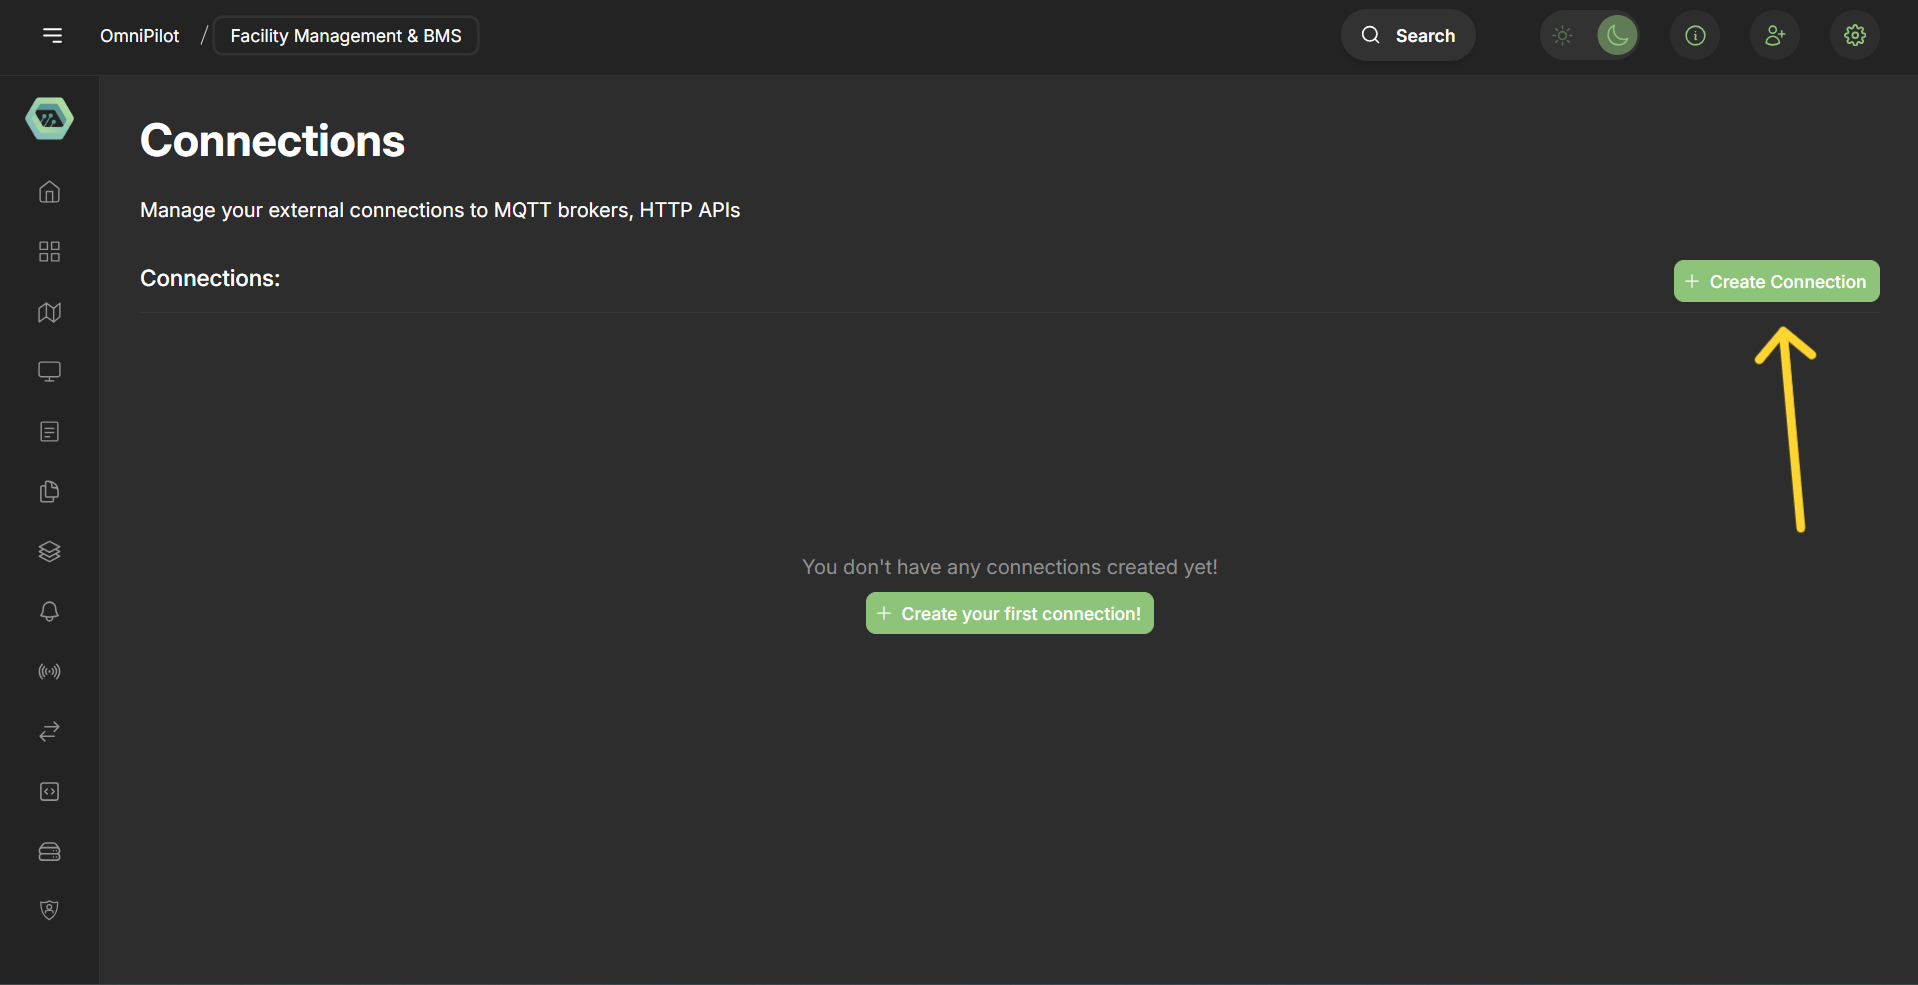
Step 1: Create Connection
Click the Create Connection button.
Step 2: Configure Connection
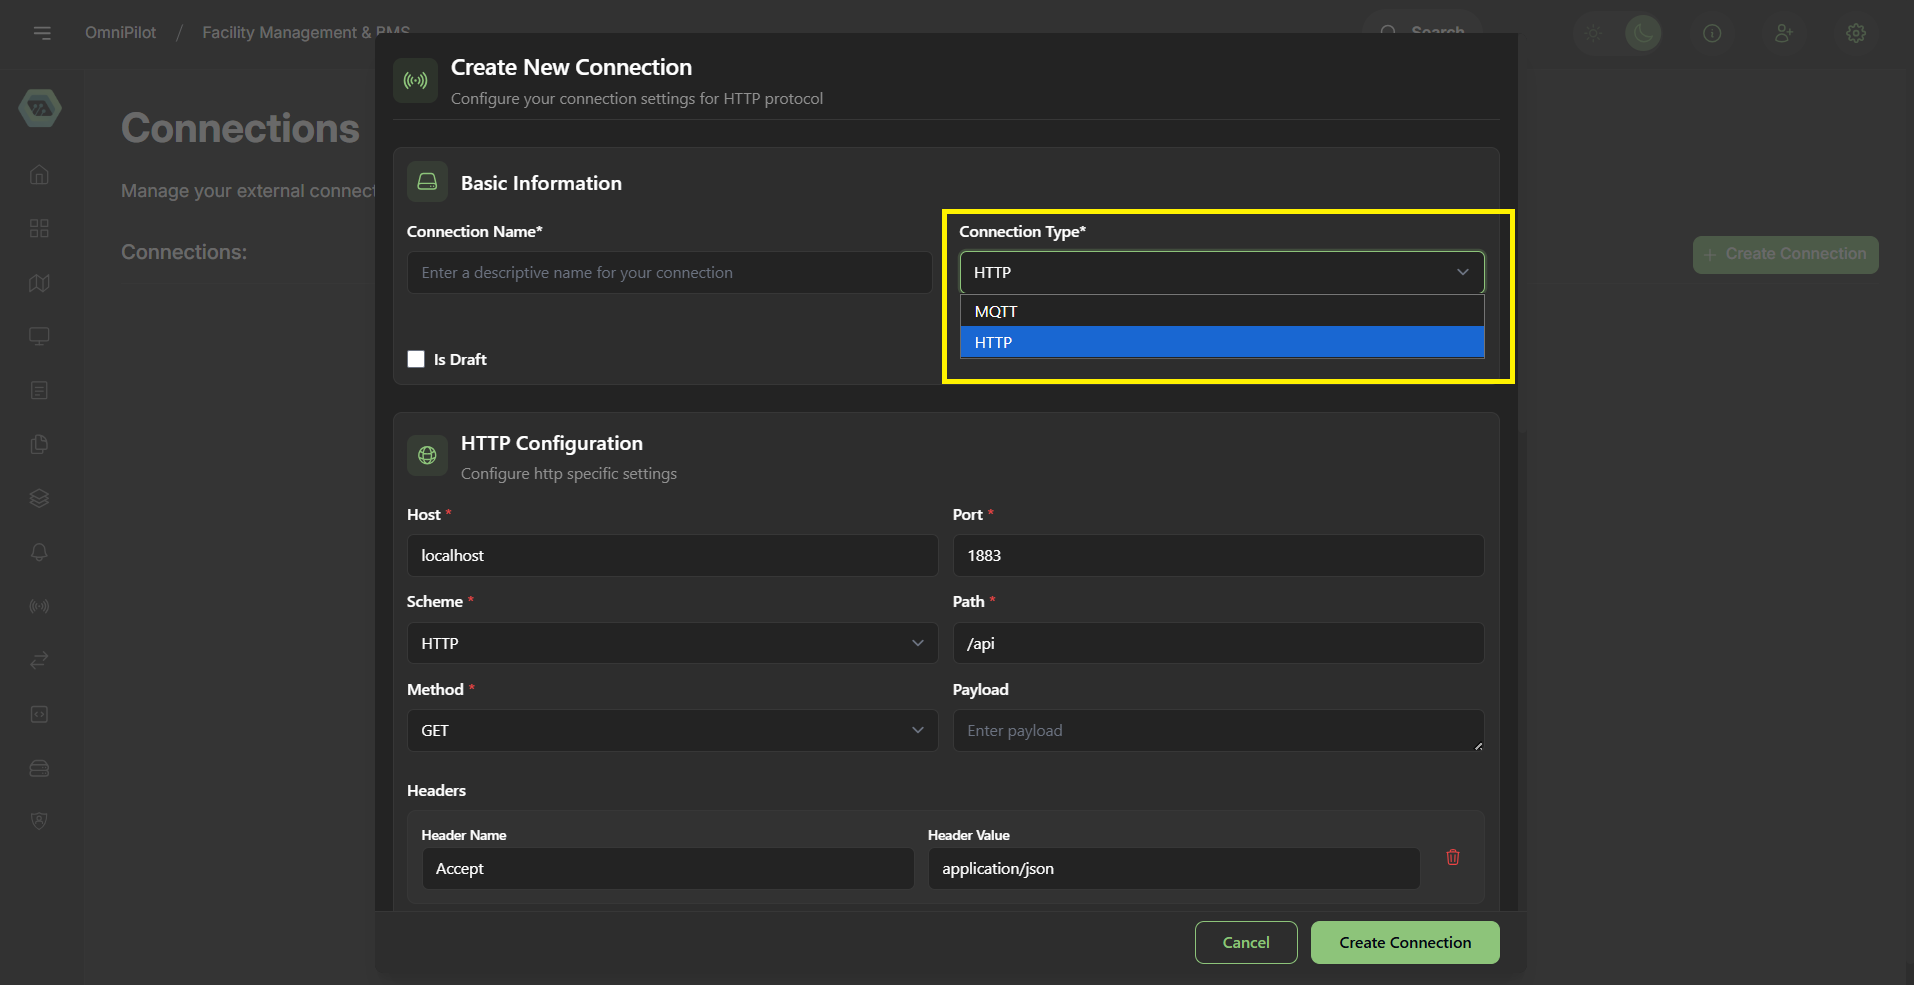
Select the connection type and fill out the form, then click the Create button.
Choose between:
- MQTT: For IoT devices and real-time messaging
- HTTP: For REST API integration and web services
We are using the HTTP connection type for this example. :::
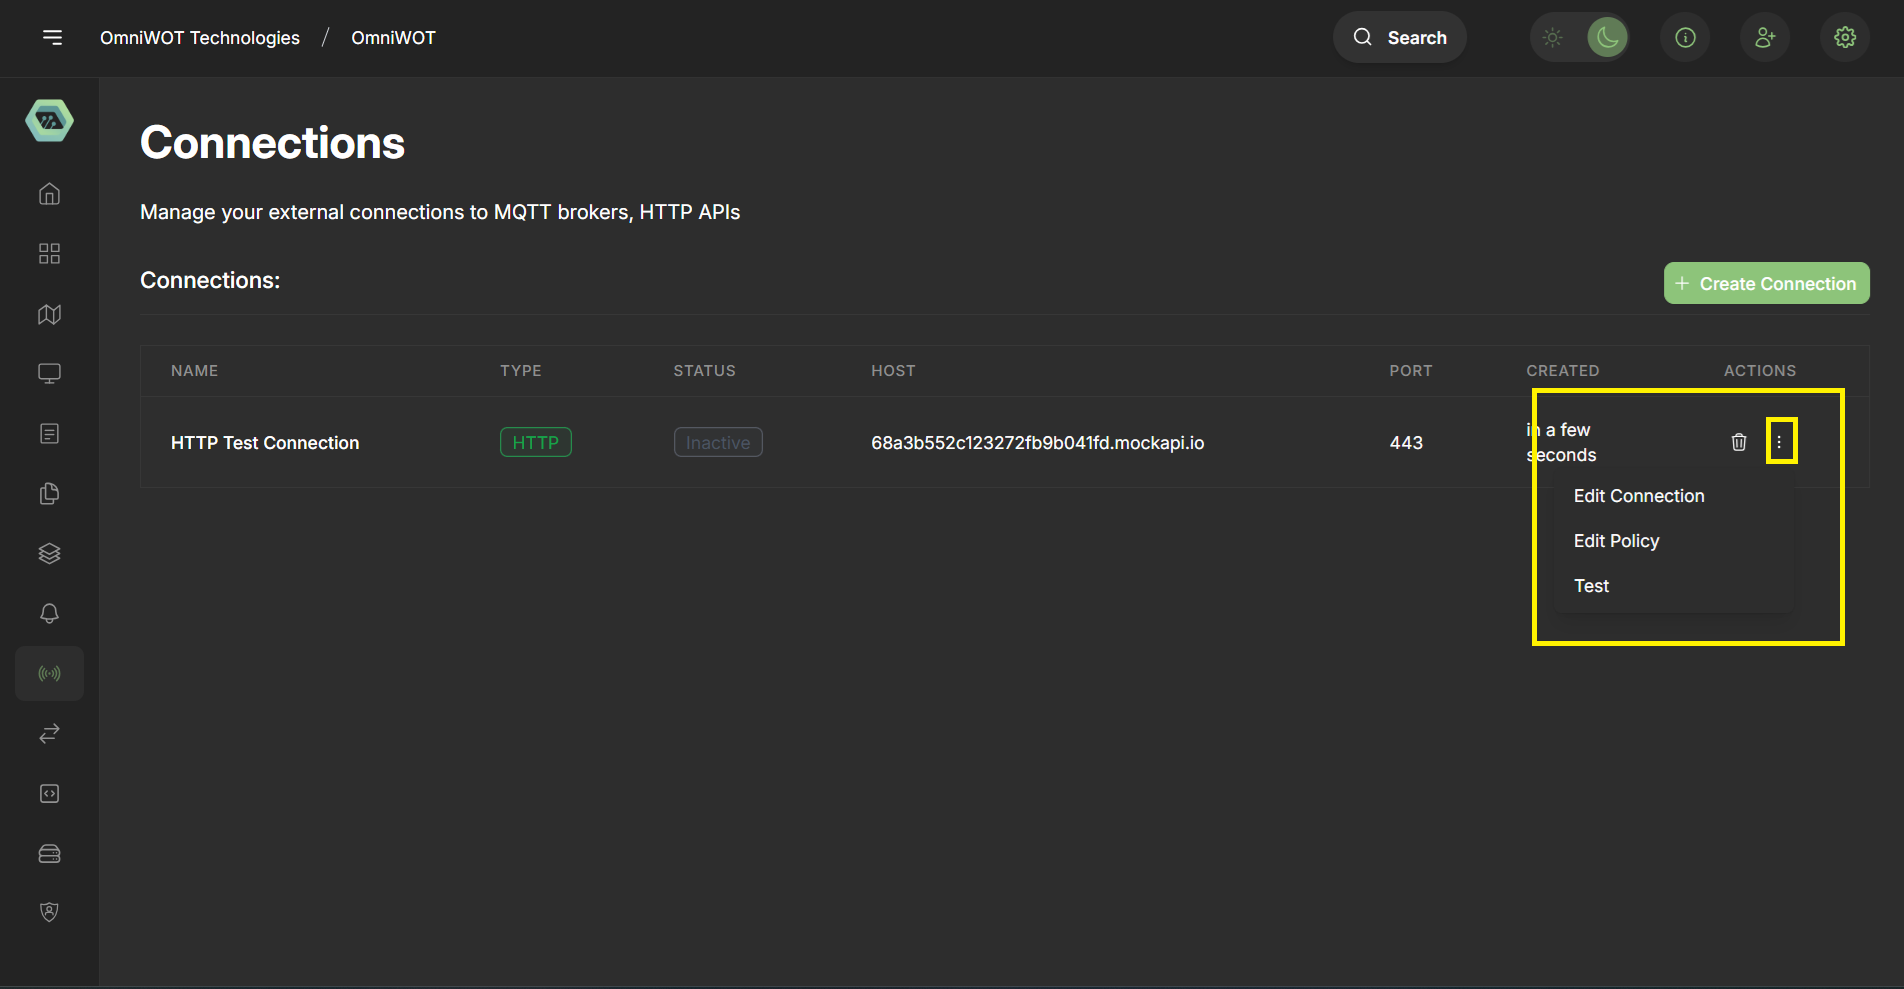
Step 3: View Connection
After creating the connection, you can see it in the connections list.
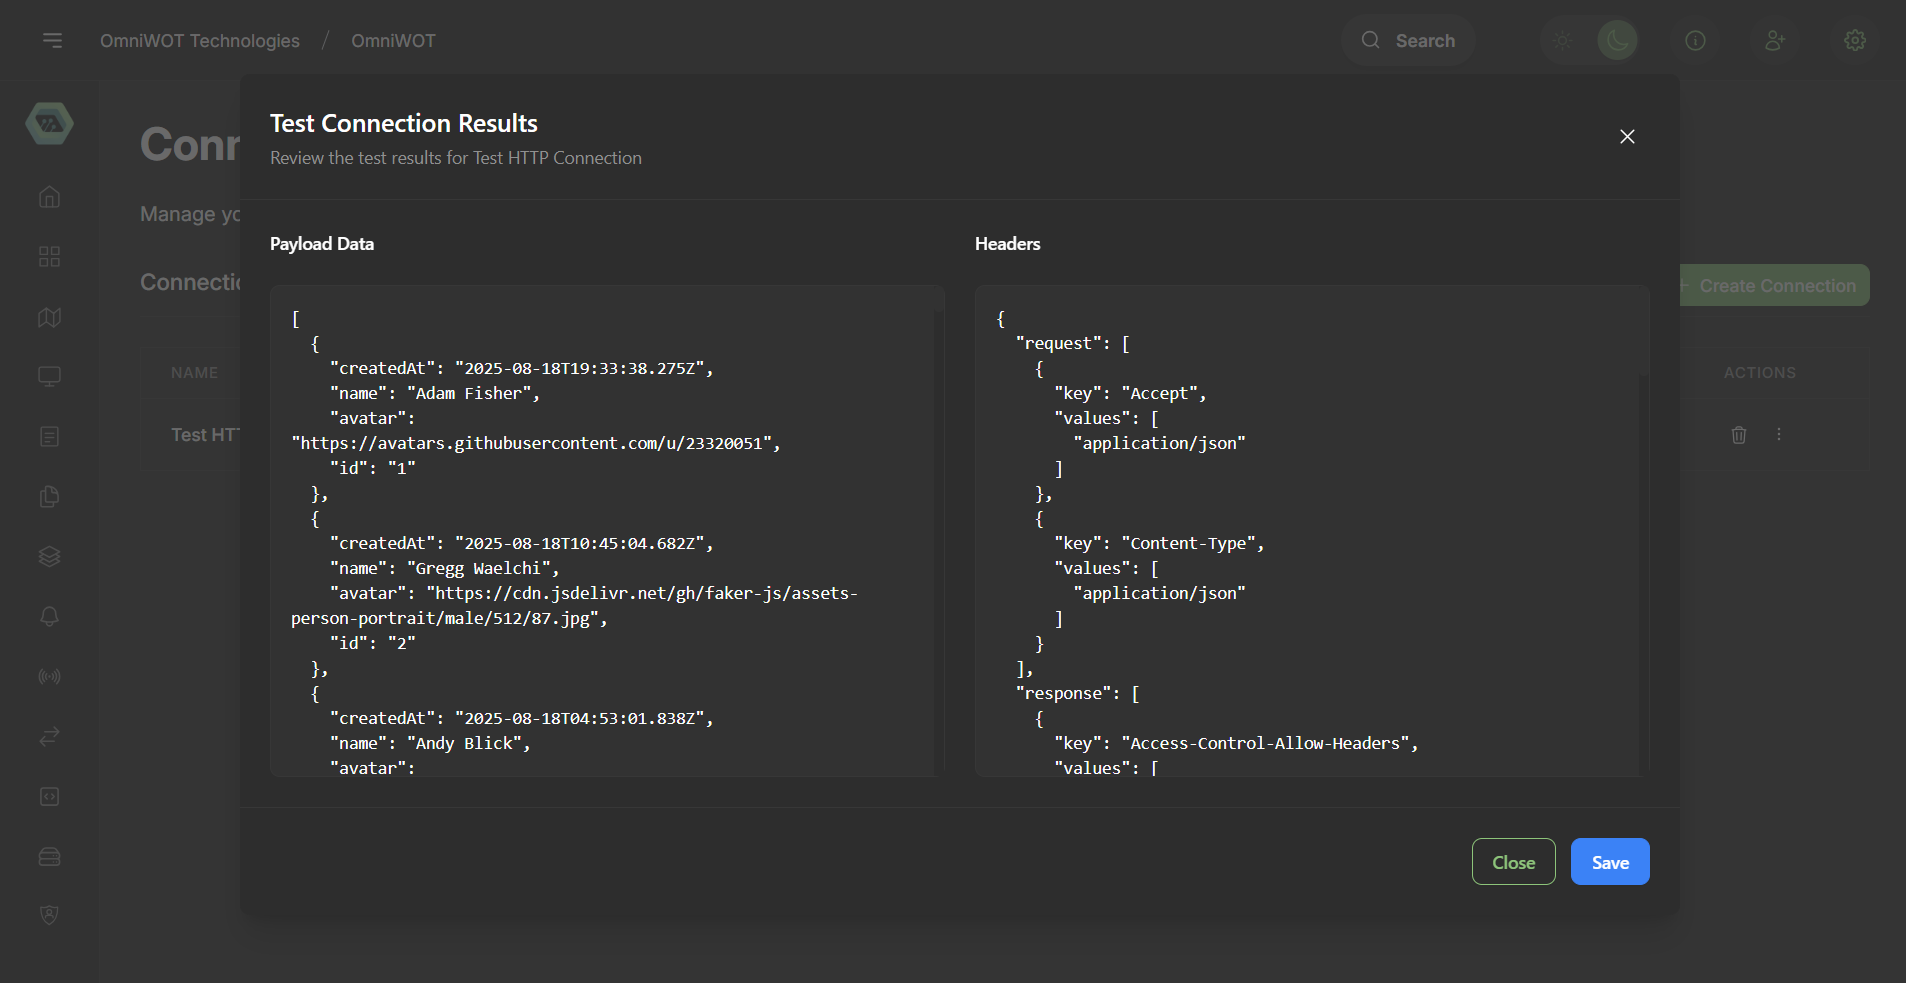
Step 4: Test Connection
Click the Test Connection button to test the connection.
If the connection is successful, you will see the connection result with payload and headers data. You can also save this data to create a new policy.
Creating or Editing a Policy
Step 1: Access Policy Editor
Click the Edit Policy button to edit or create the policy.
Step 2: Policy Editor Interface
After clicking the Edit Policy button, you will be redirected to the policy editor page.
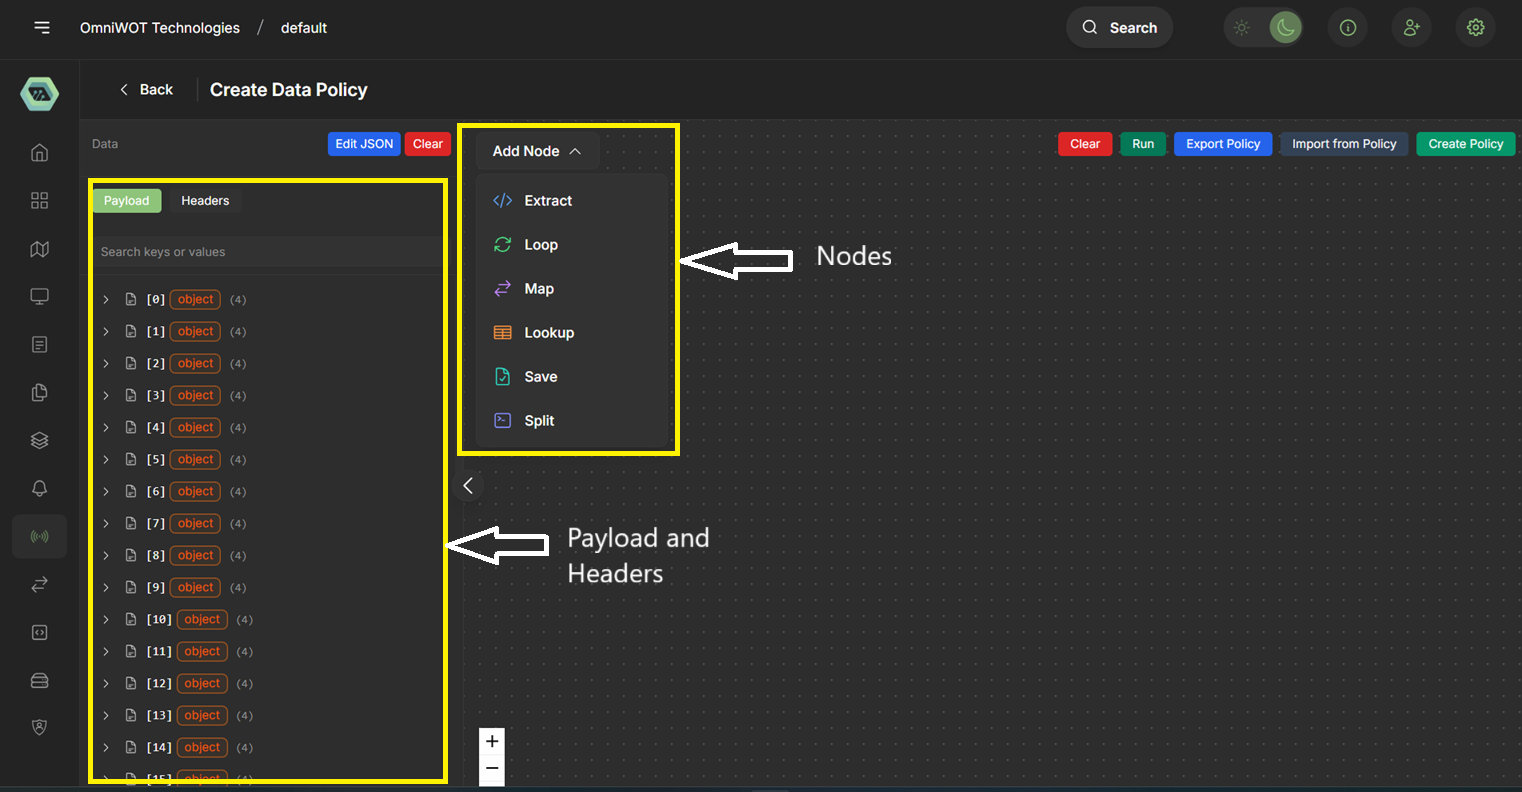
Policy Editor Features
- Node Management: Create or edit a policy by adding or removing nodes in the editor
- Data Preview: On the left side, you will see a JSON tree displaying the payload and headers data
- Node Selection: There is an "Add Node" dropdown menu that lists all available node types
- Node Addition: To add a node, click the "Add Node" dropdown and select the node you want to insert
- Node Connections: You can add multiple nodes to the policy and connect them to each other using edges
Step 3: Building Your Policy
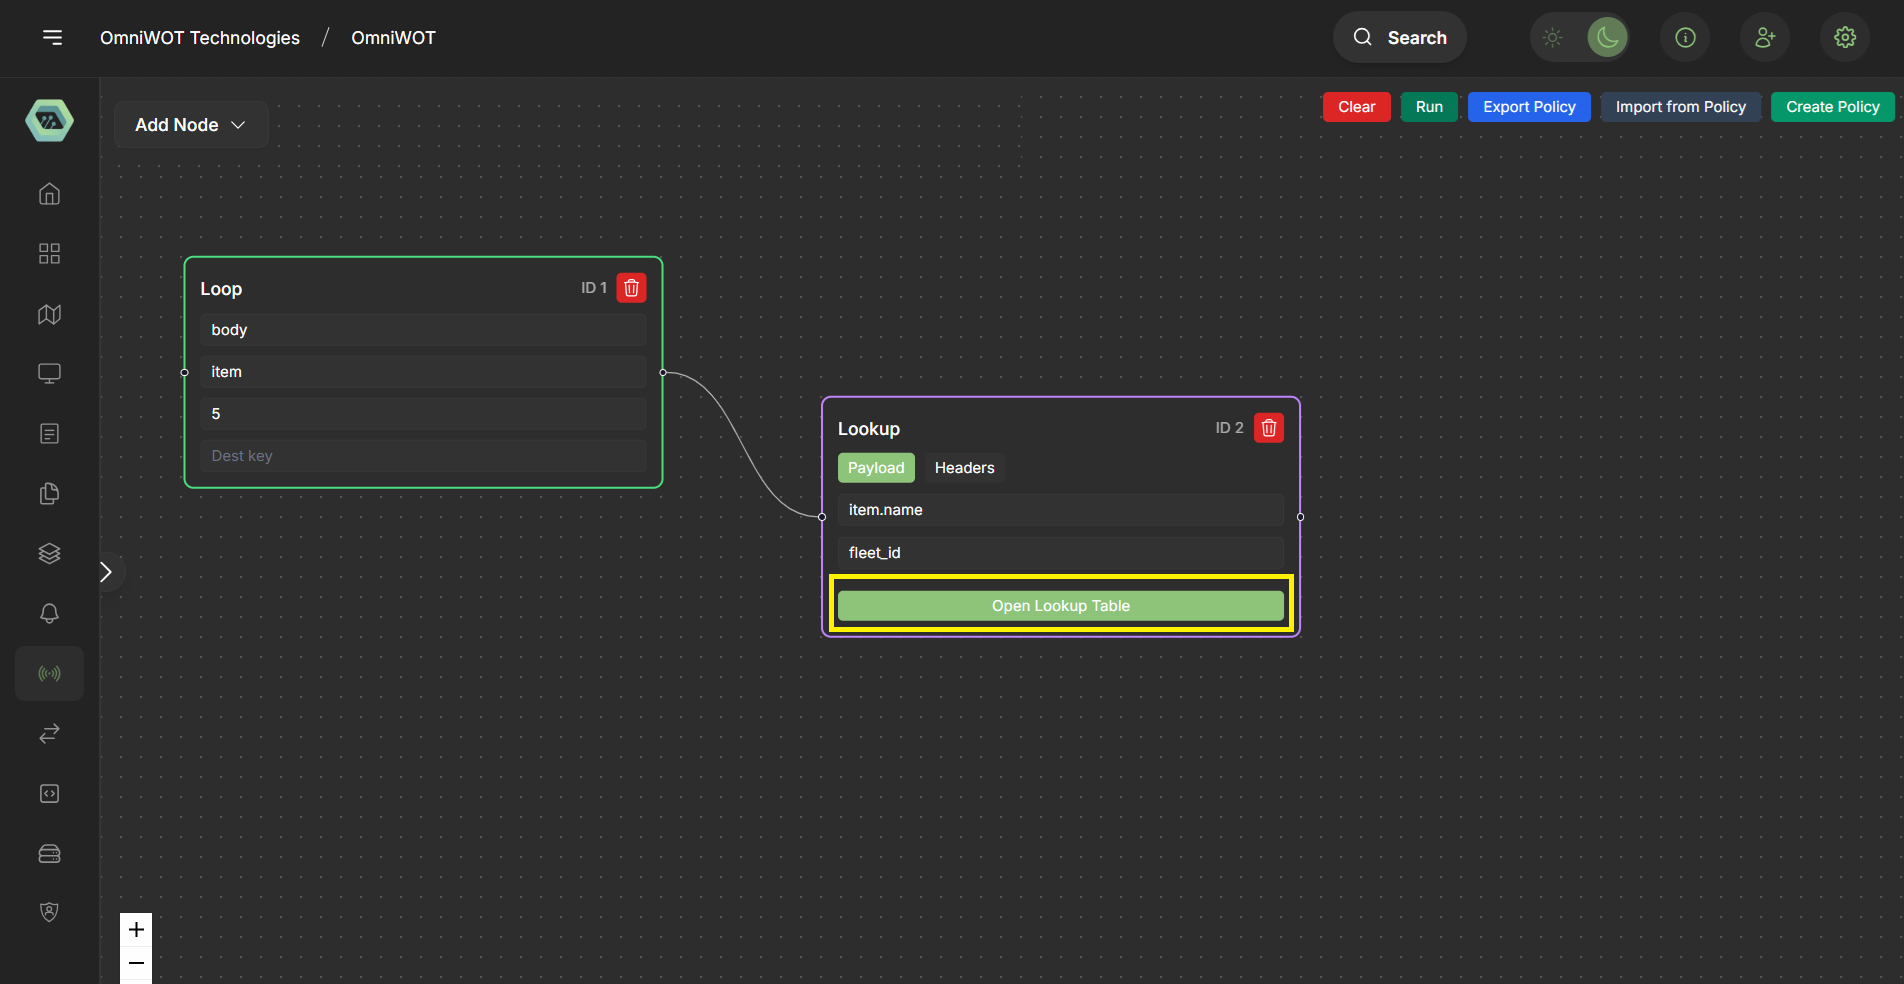
In this example, we have added two nodes, "loop" and "lookup", to the policy and connected them using edges.
- To map an external identifier ID with an internal identifier ID, click the "Open Lookup Table" button within the lookup node to open the lookup table.
Step 4: Configure Lookup Table
After clicking on the Open Lookup Table button, you will see the lookup table modal.
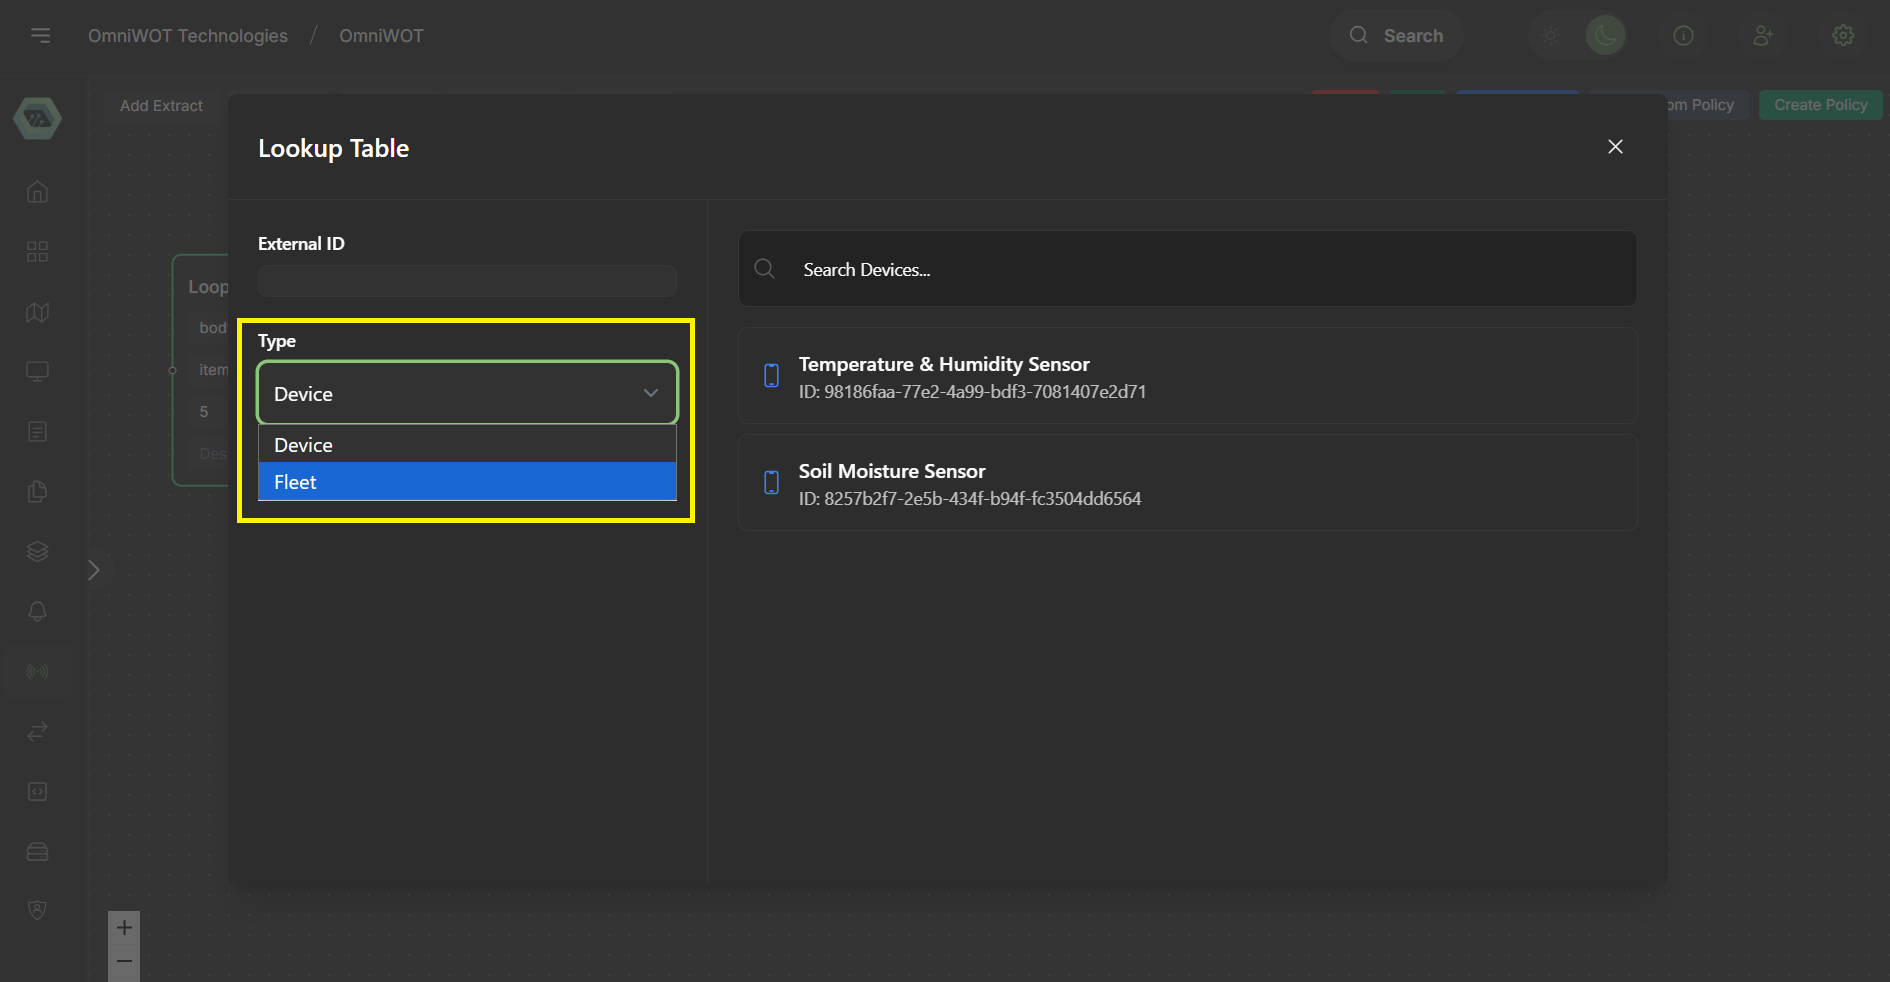
Lookup Table Configuration
- Select Identifier Type: Choose either "Device" or "Fleet"
- Select Entity: After choosing the type, select the specific device or fleet from the list and click the "Save" button to confirm your selection
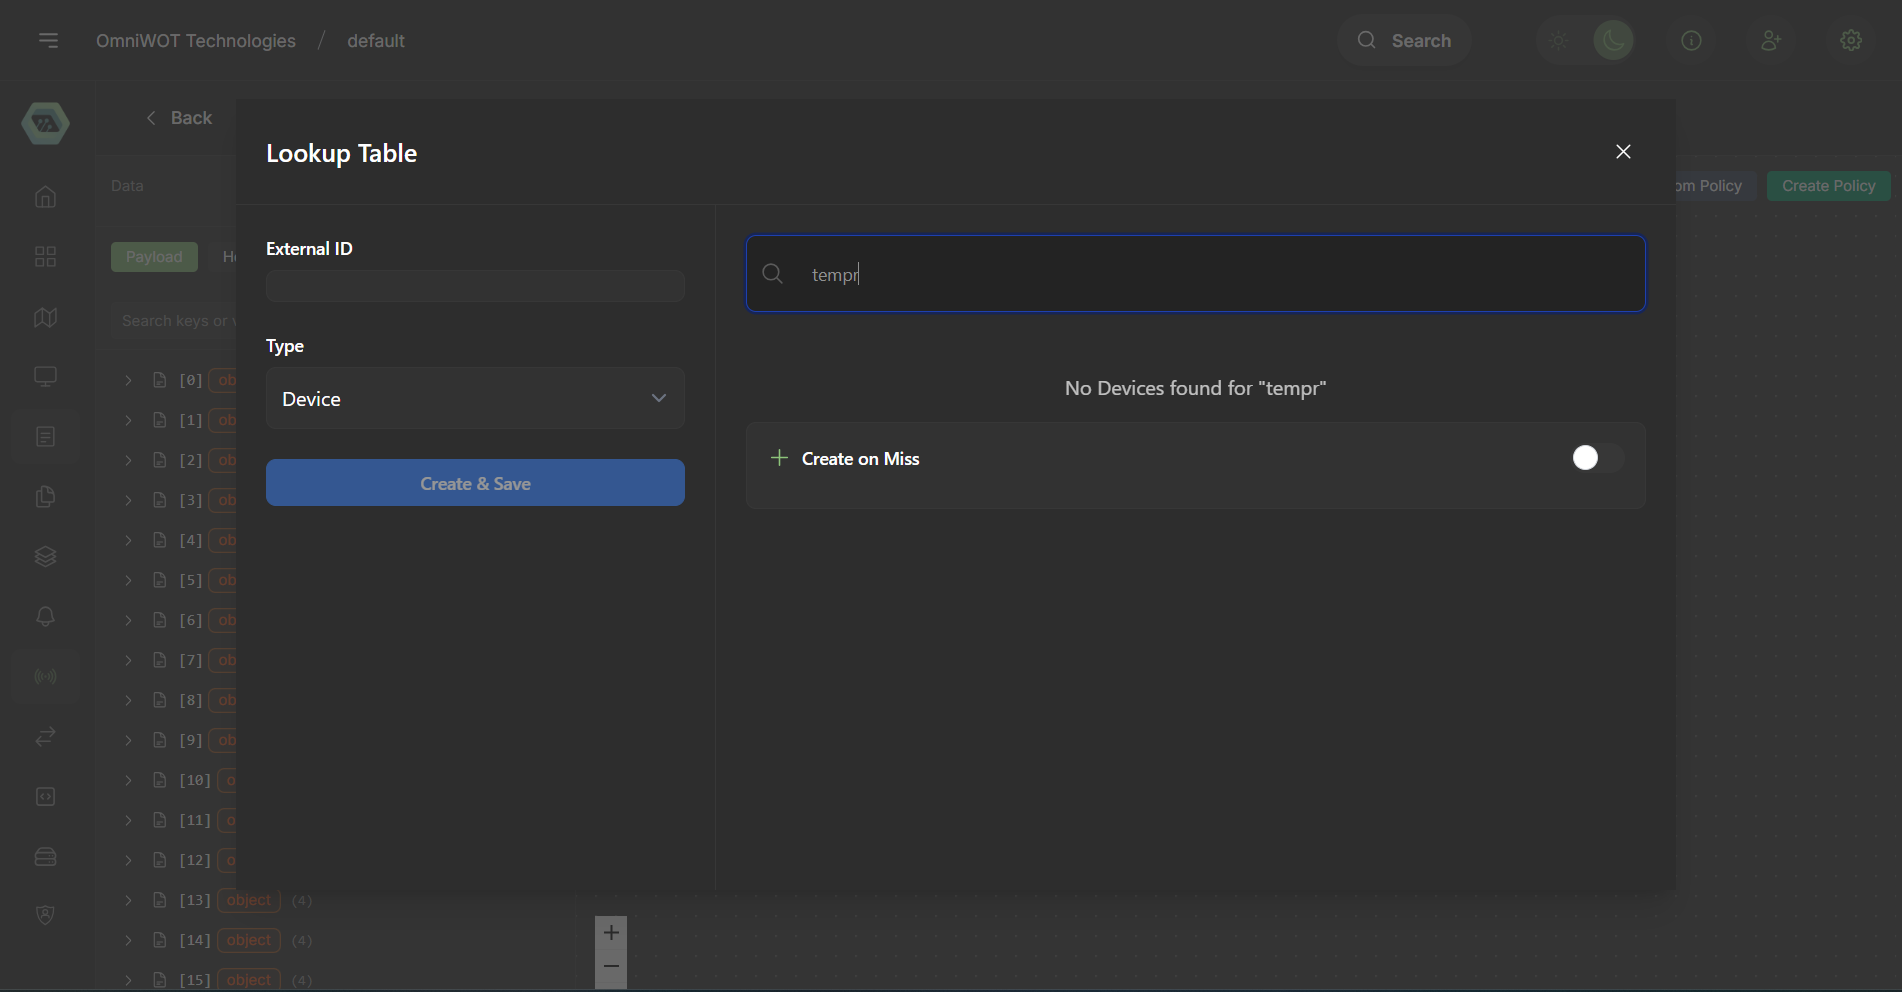
- Create Missing Entities: If you do not find the desired device or fleet in the list, you can enable the "Create on missing" option and click the "Create and Save" button to add a new device or fleet to the platform
Step 5: Configure Data Point Mapping
Now, we are adding a new map node to map data points. Click on the Edit Mapping Policy button.
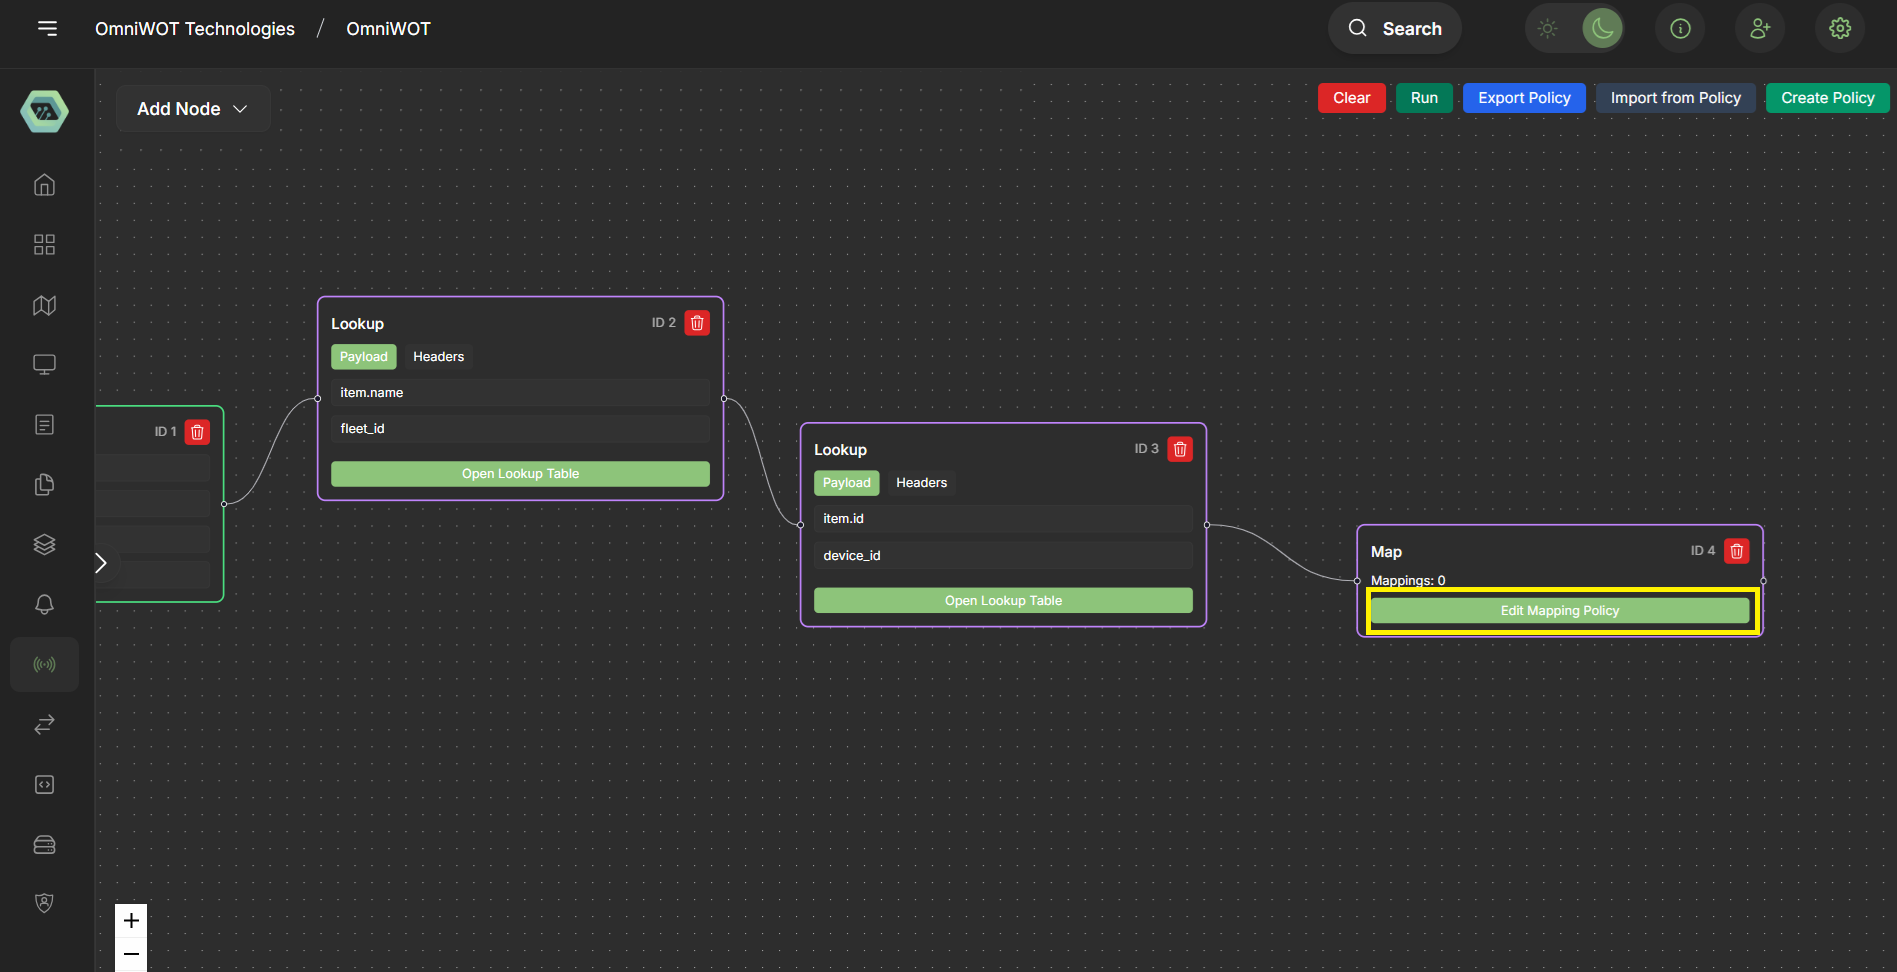
The mapping policy editor modal will now appear.
Mapping Policy Editor Interface
- Sample Payload: On the left side, you will see a sample payload
- Data Point Options: On the right side, you have two options: create a new data point or edit and use an existing data point
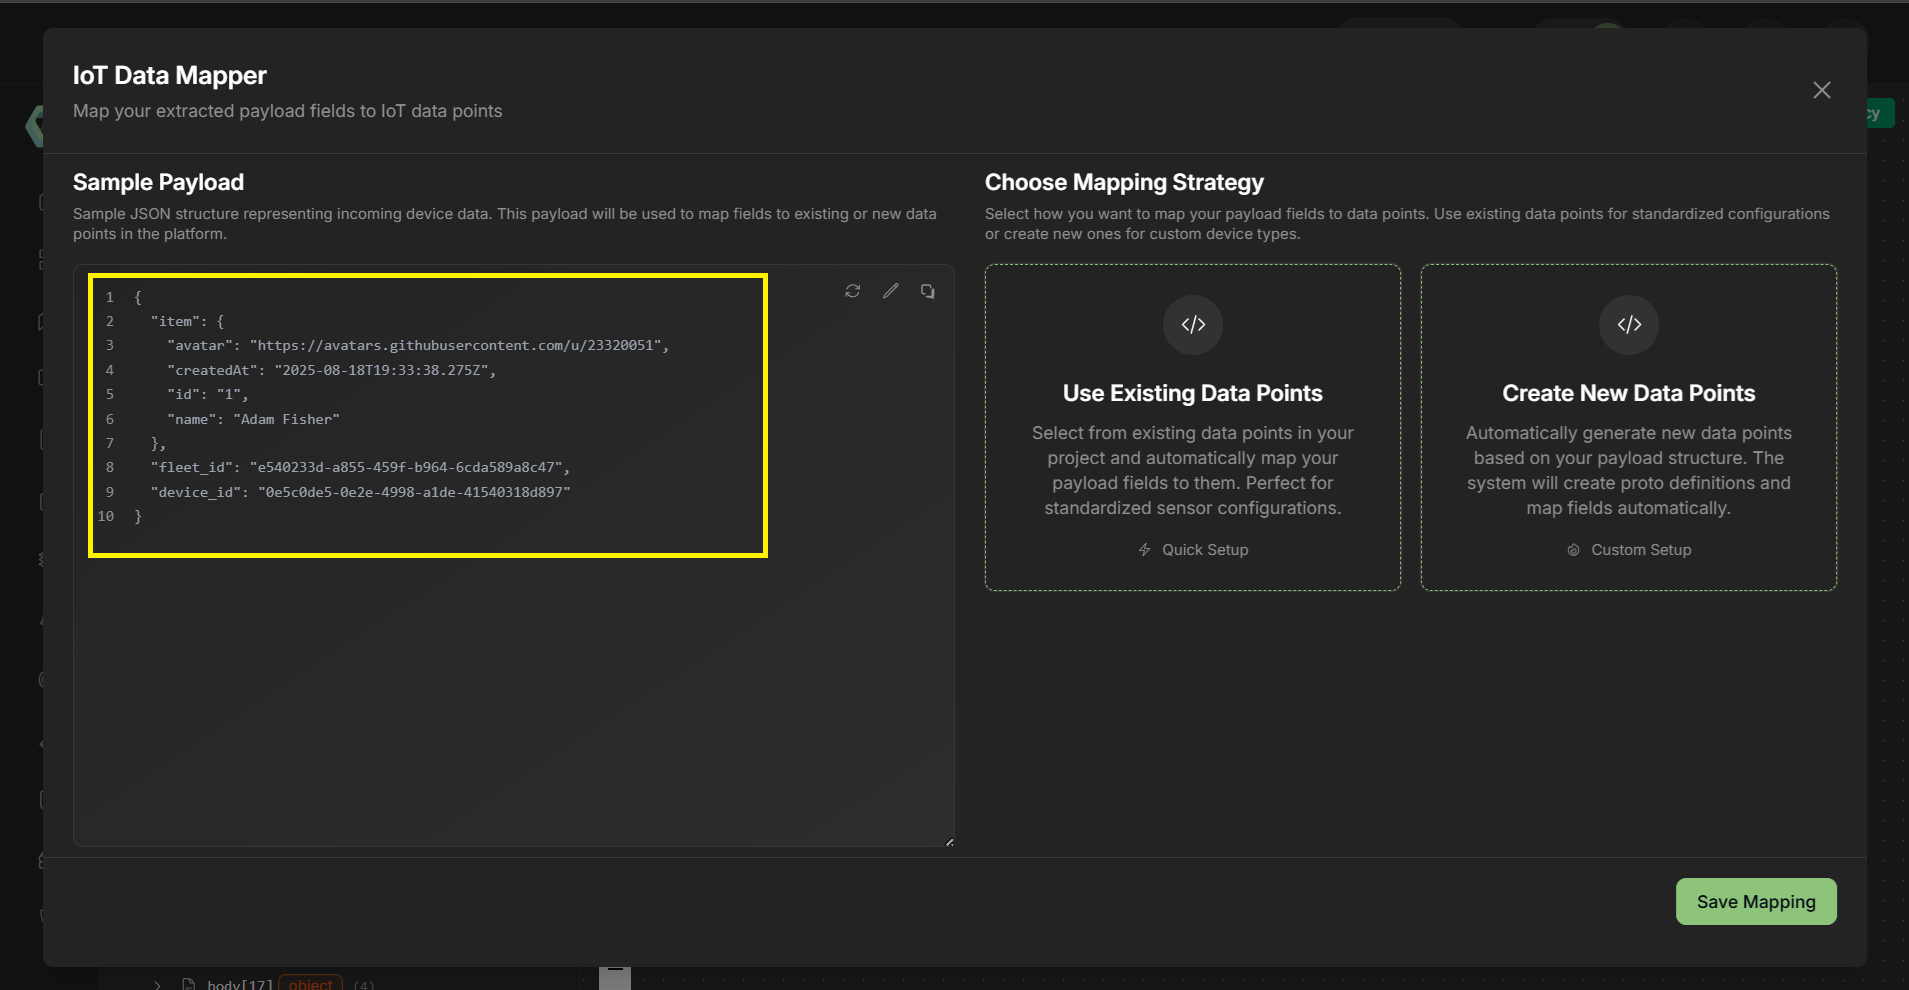
Step 6: Create New Data Point
Creating a New Data Point
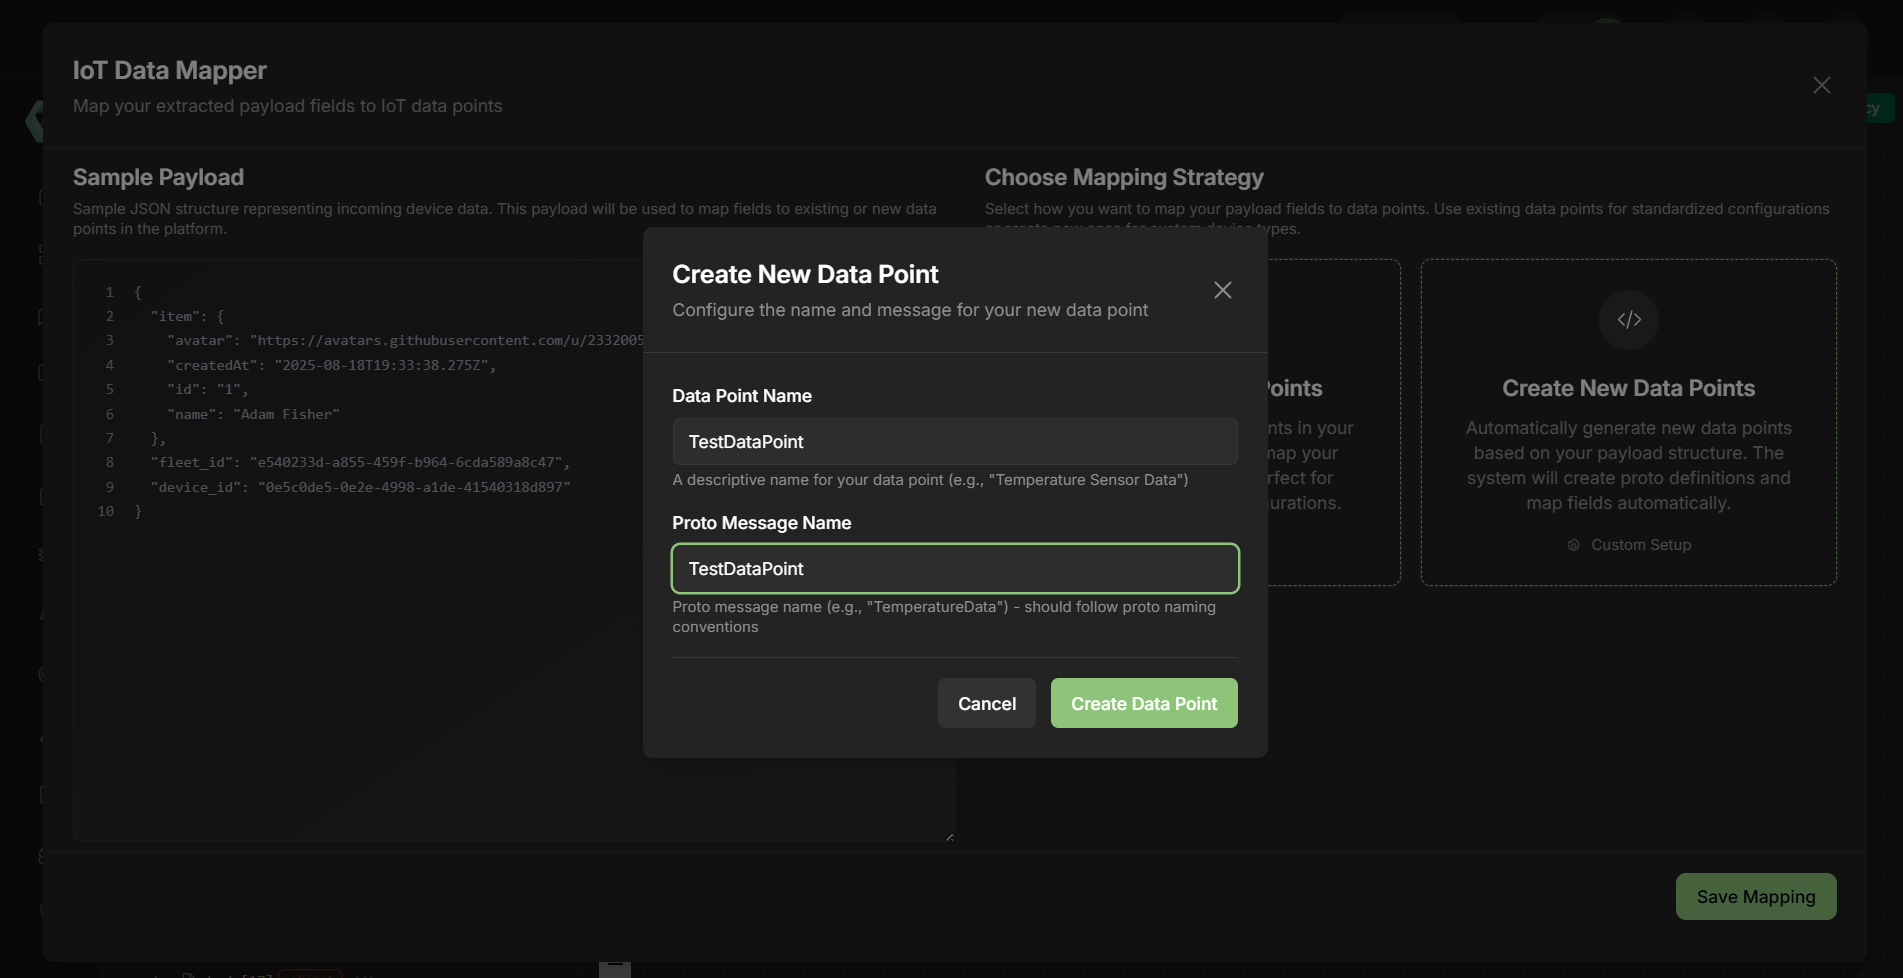
Write the data point name and proto message name, then click the "Create Data Point" button.
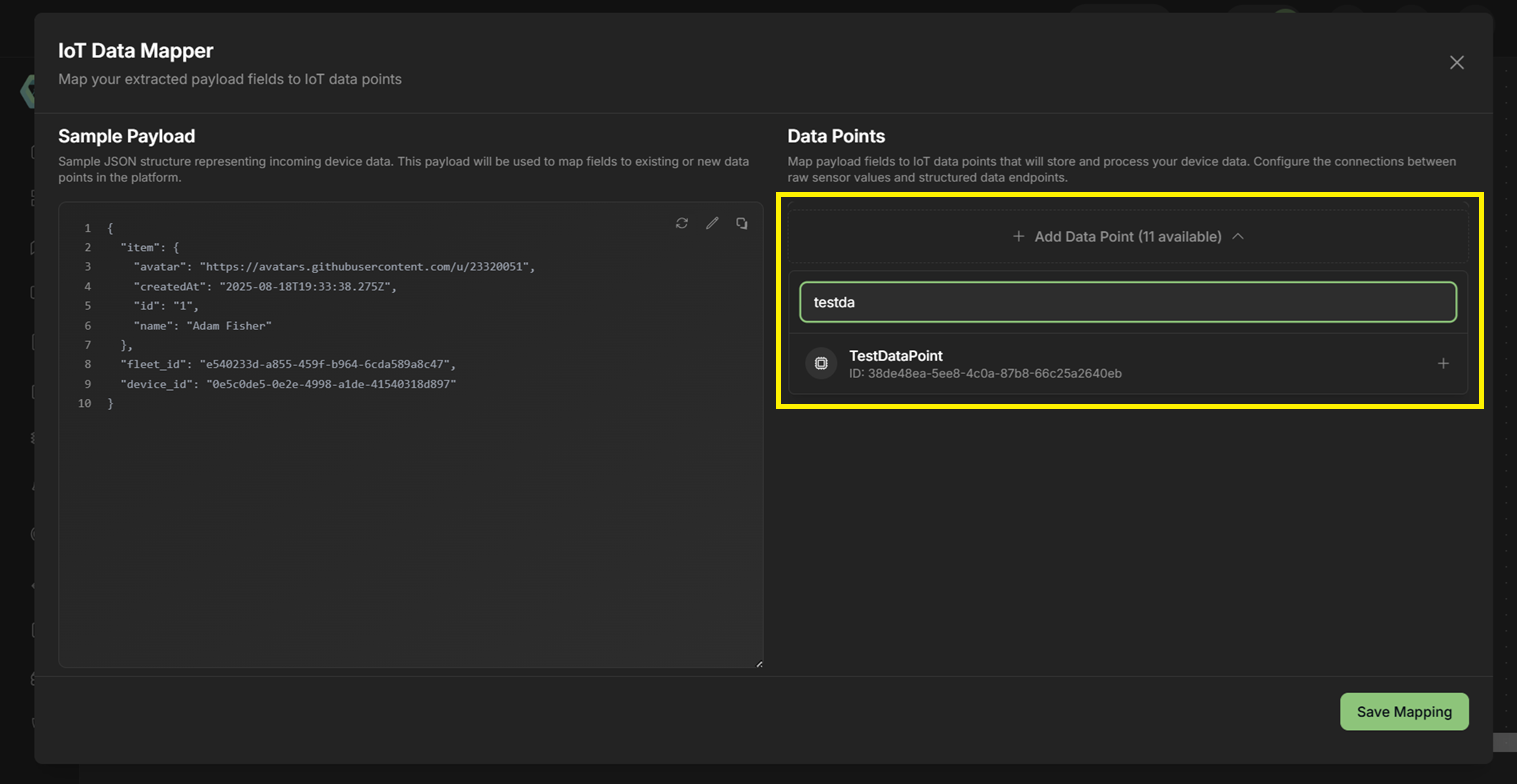
- Now, you will see the new data point in the list. Click on the data point to select it
- You can also map multiple data points to the sample payload
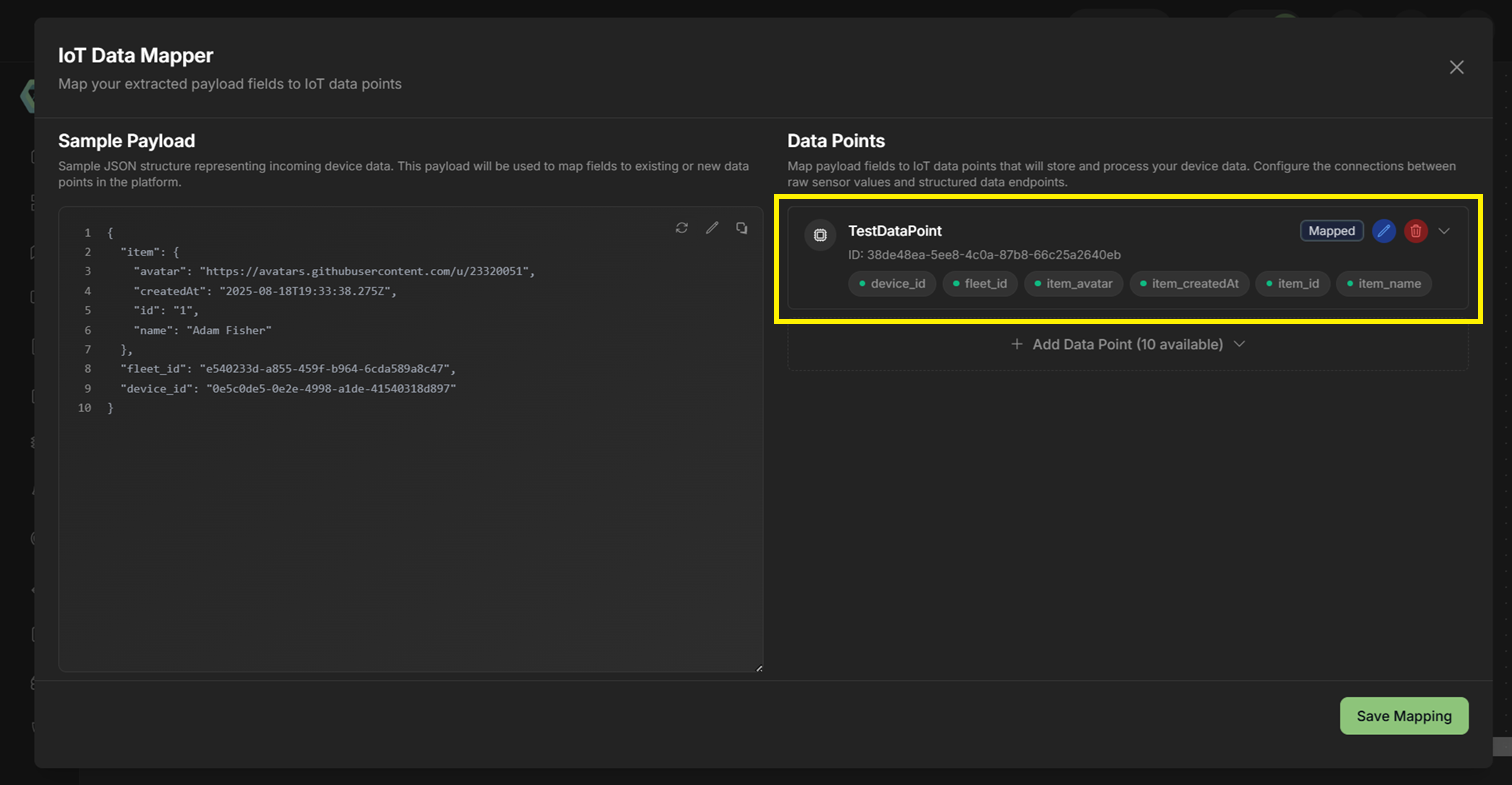
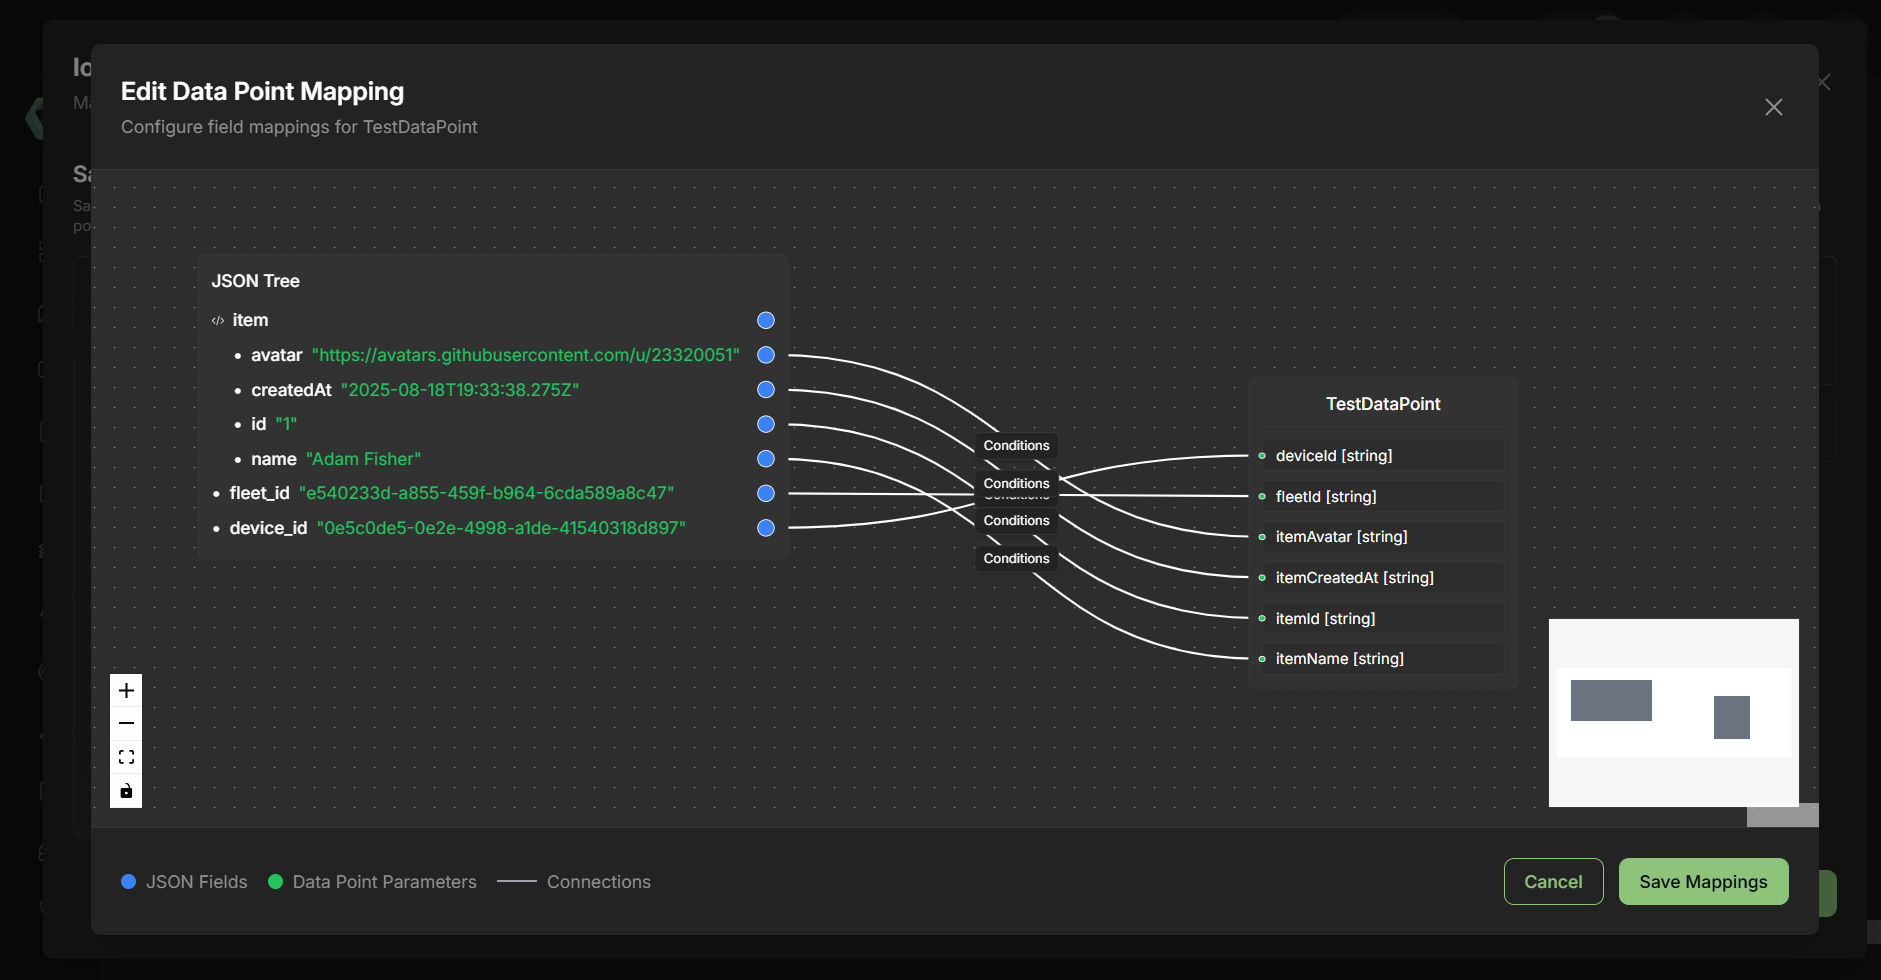
Step 7: Complete Data Point Mapping
- You can see the data point automatically map to the sample payload
- If you want to map the data point to a different field, you can edit the mapping policy
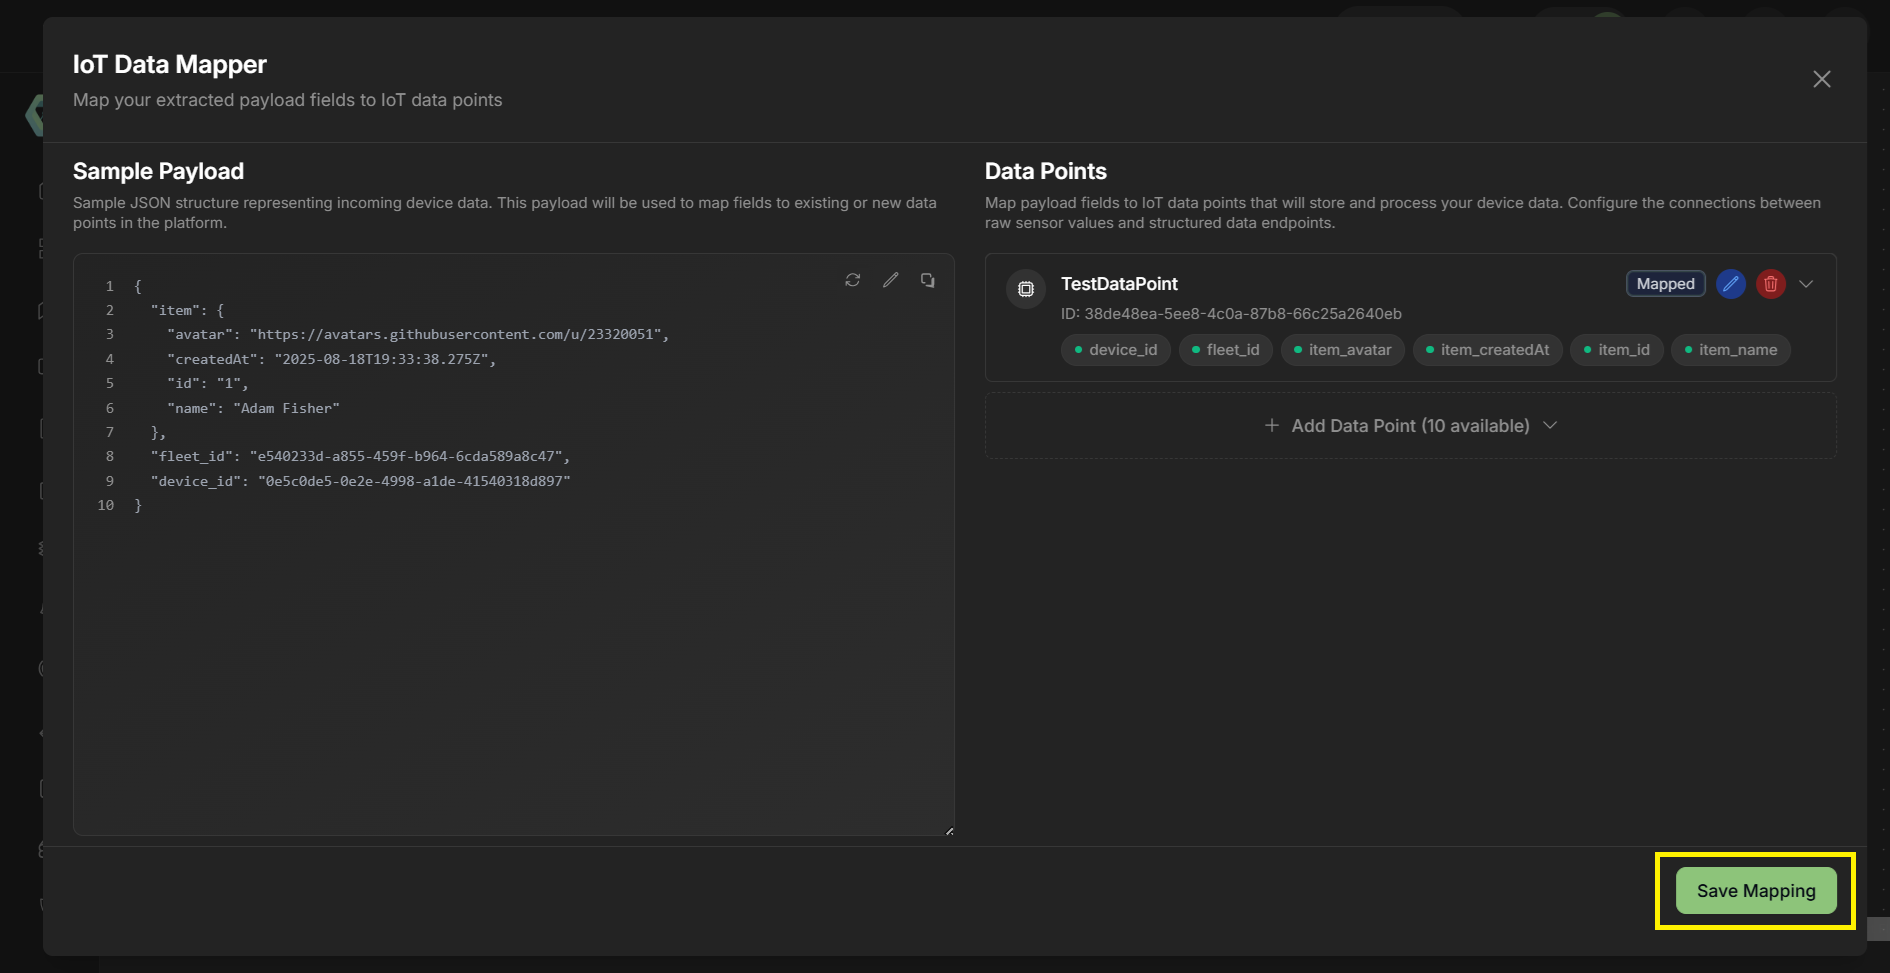
- After editing the mapping policy, you can save the policy by clicking the "Save Mapping" button
Step 8: Save Mapping Policy
- Once you save the mapping policy, it will appear in the policy list
- In the modal footer, use the "Save Mapping" button to permanently save the policy
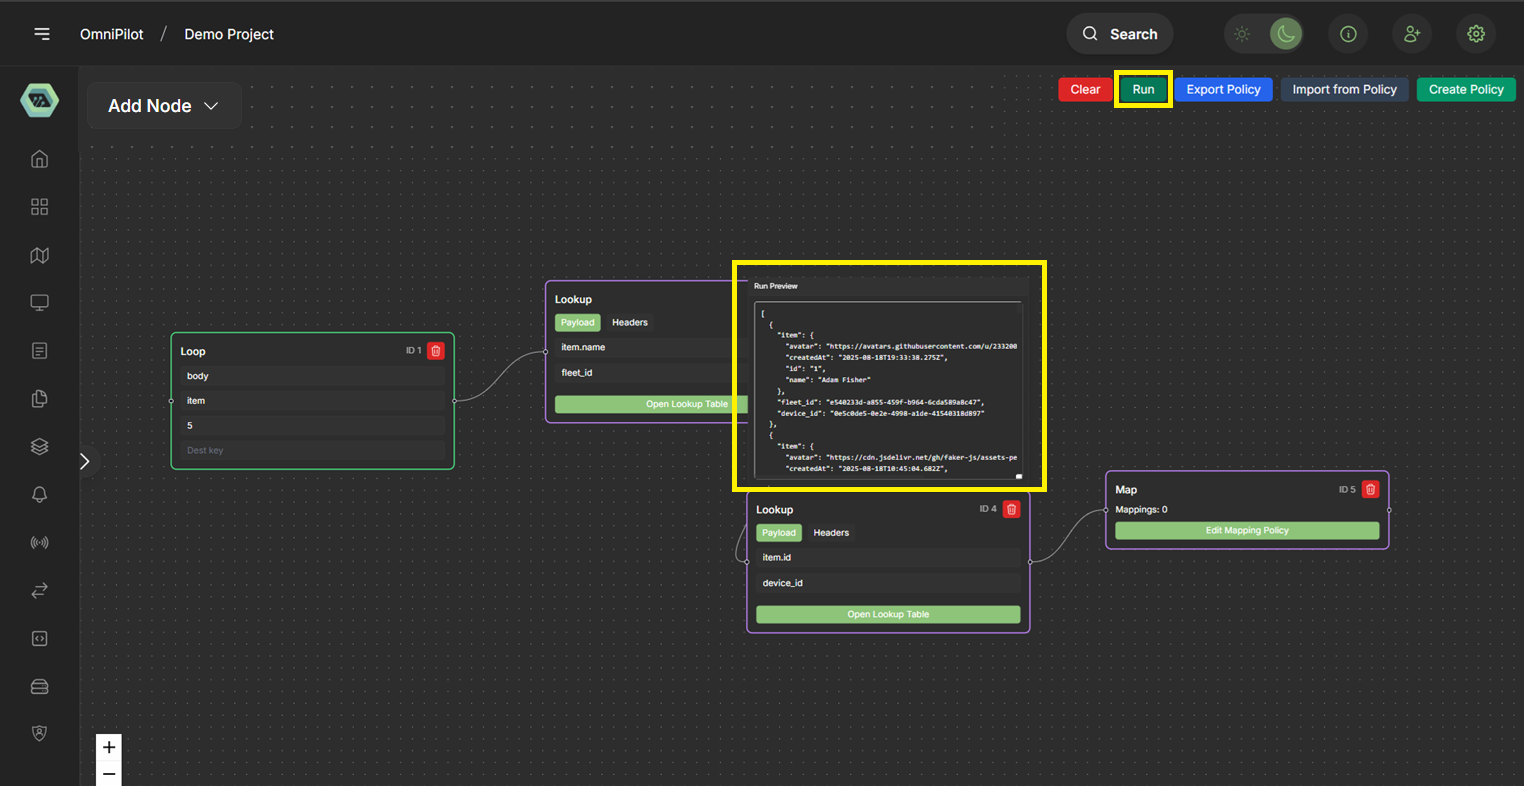
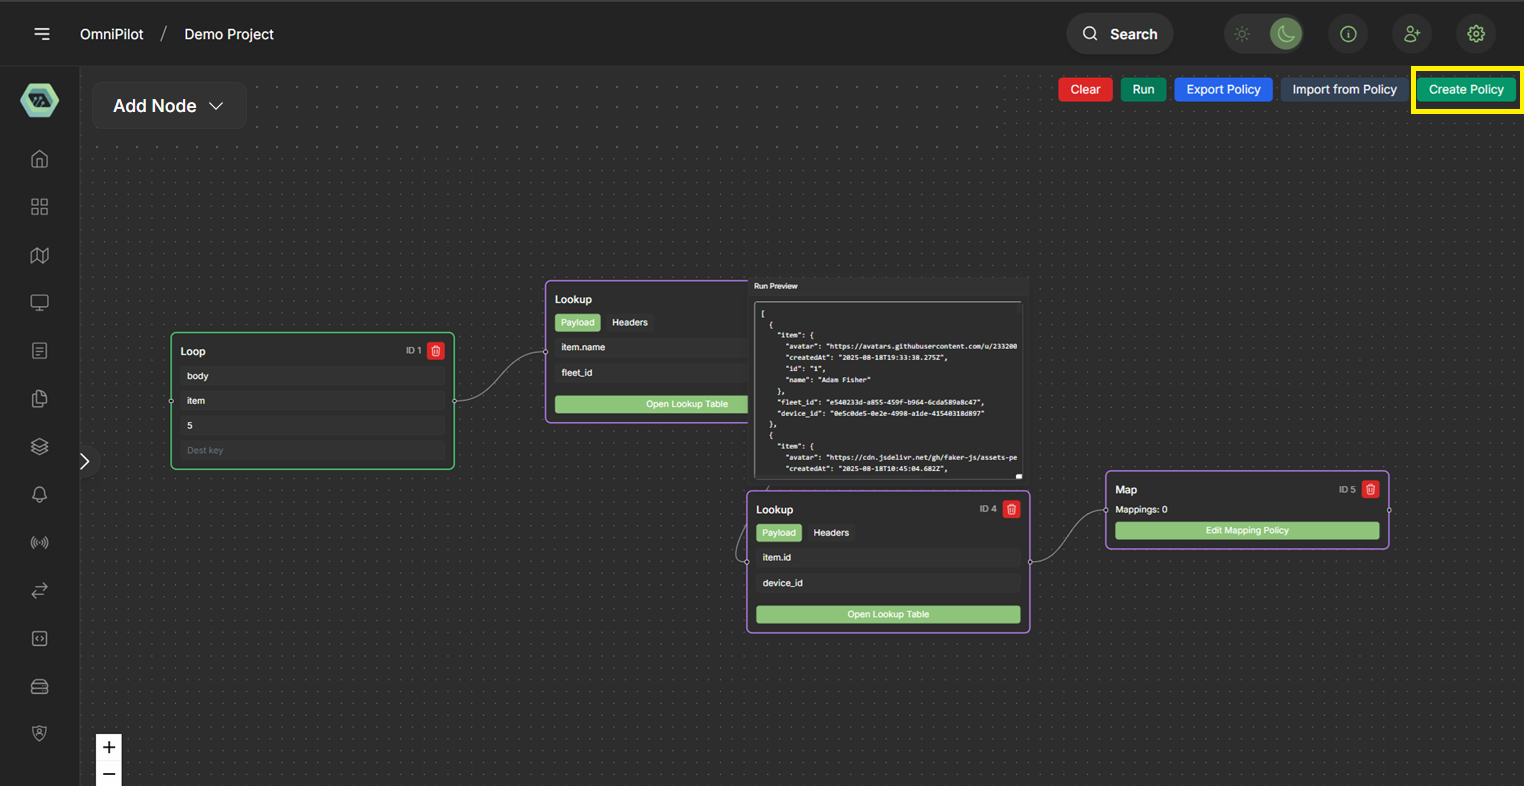
Step 9: Run/Test Policy
- Click the "Run/Test Policy" button to run/test the complete policy
- You can see the node-by-node results on hover over a node
Step 10: Create Policy
- After running/testing the policy, you can create a new policy
- Click the "Create Policy" button to create a new policy
- You can see a toast message after creating the policy
Policy Editor Features
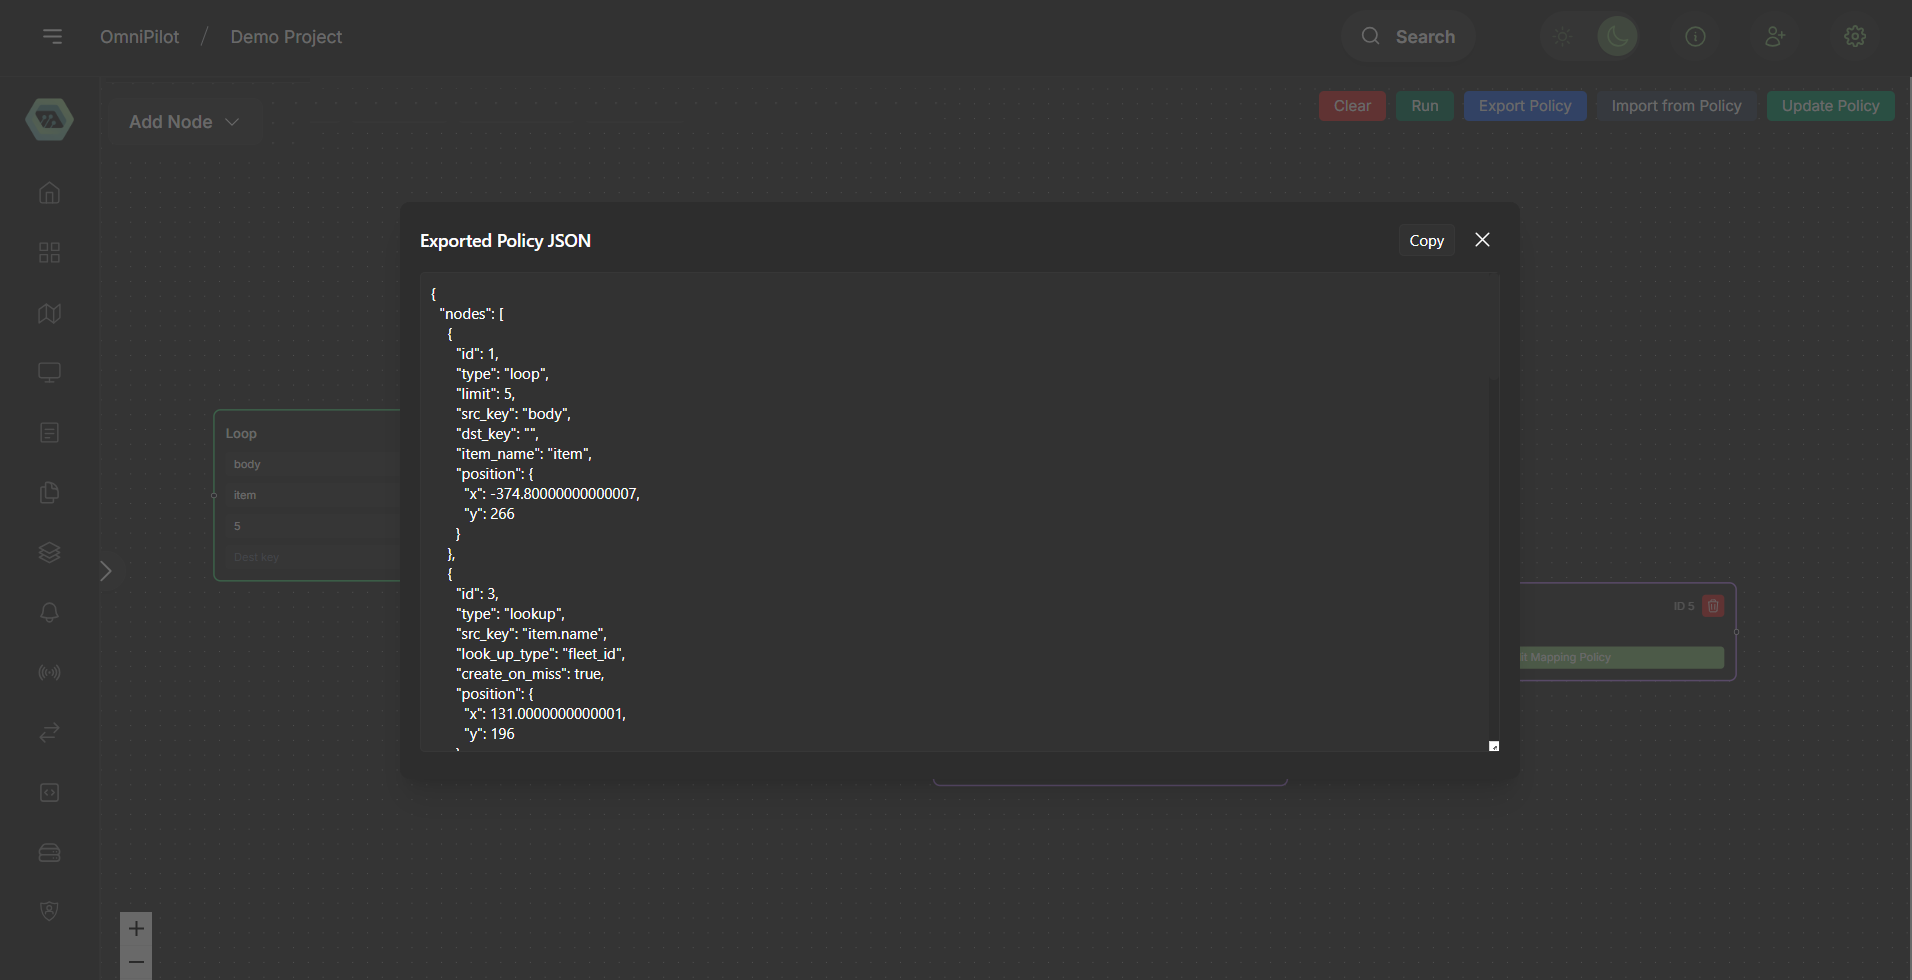
1. Export Policy
- Click the "Export Policy" button to export the policy
- You can see the policy workflow copied to the clipboard
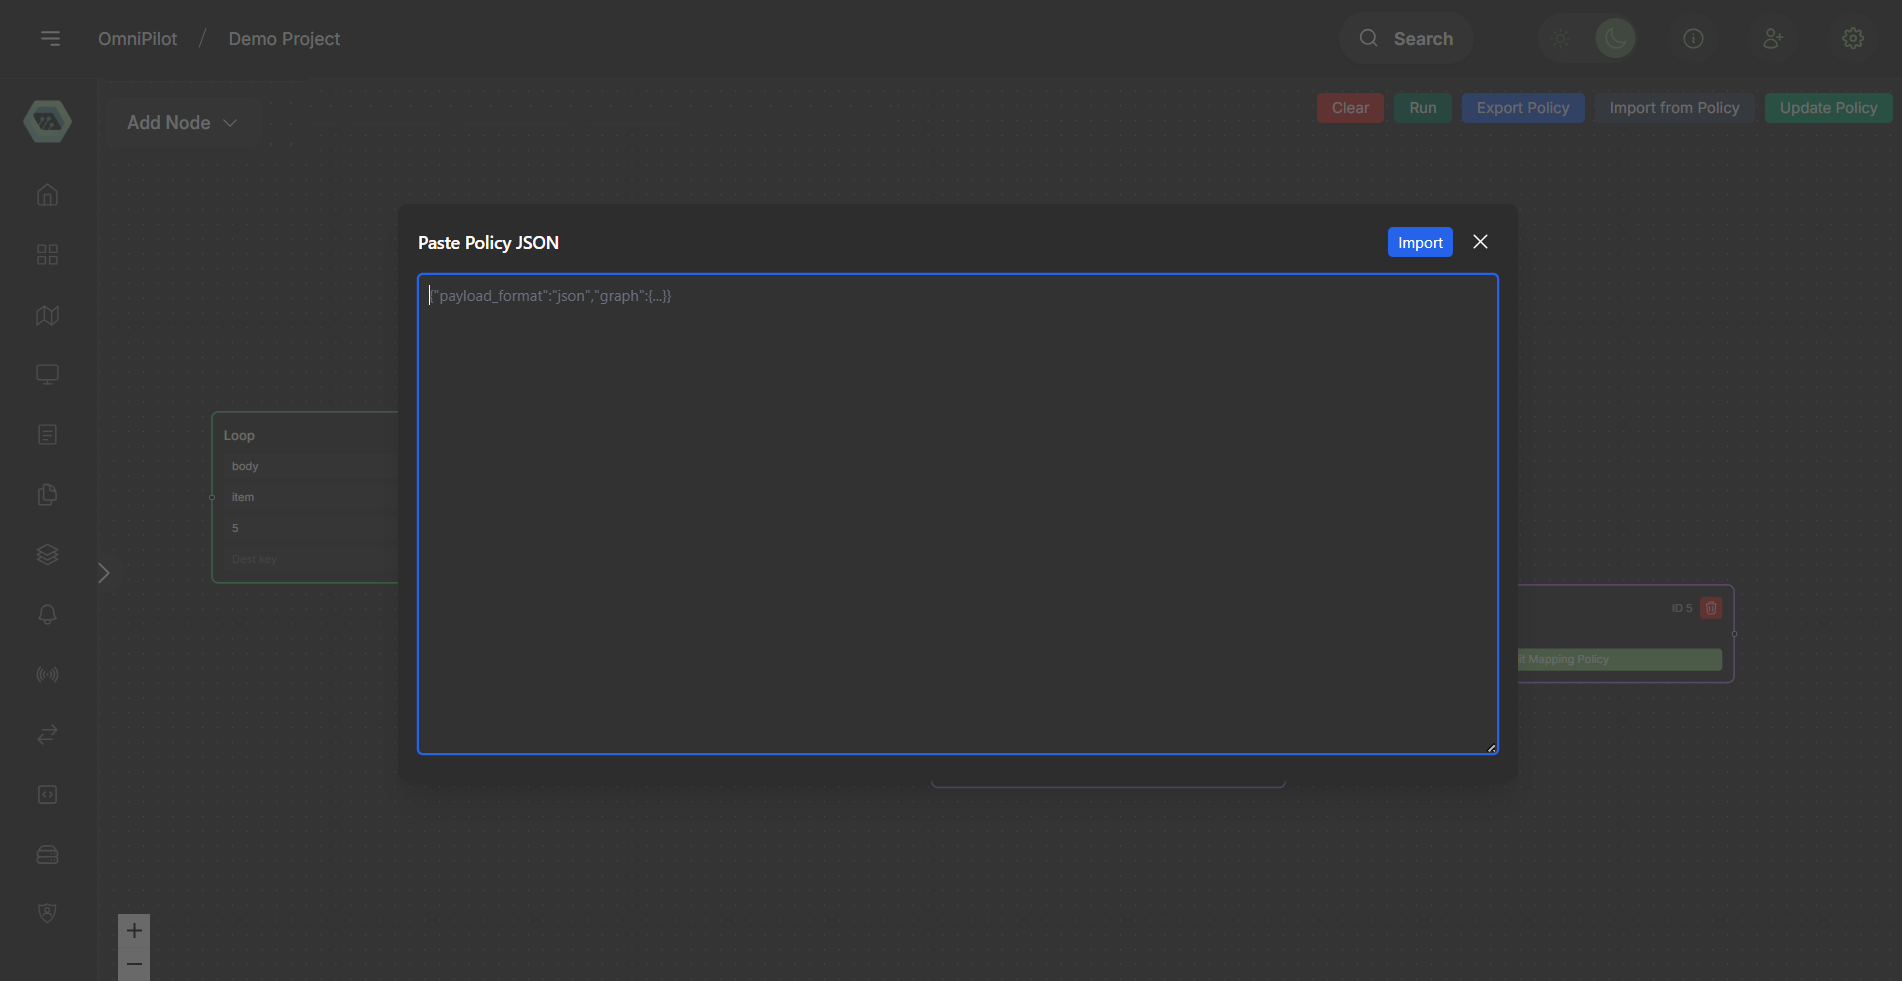
2. Import Policy
- Click the "Import Policy" button and paste the policy workflow from the clipboard
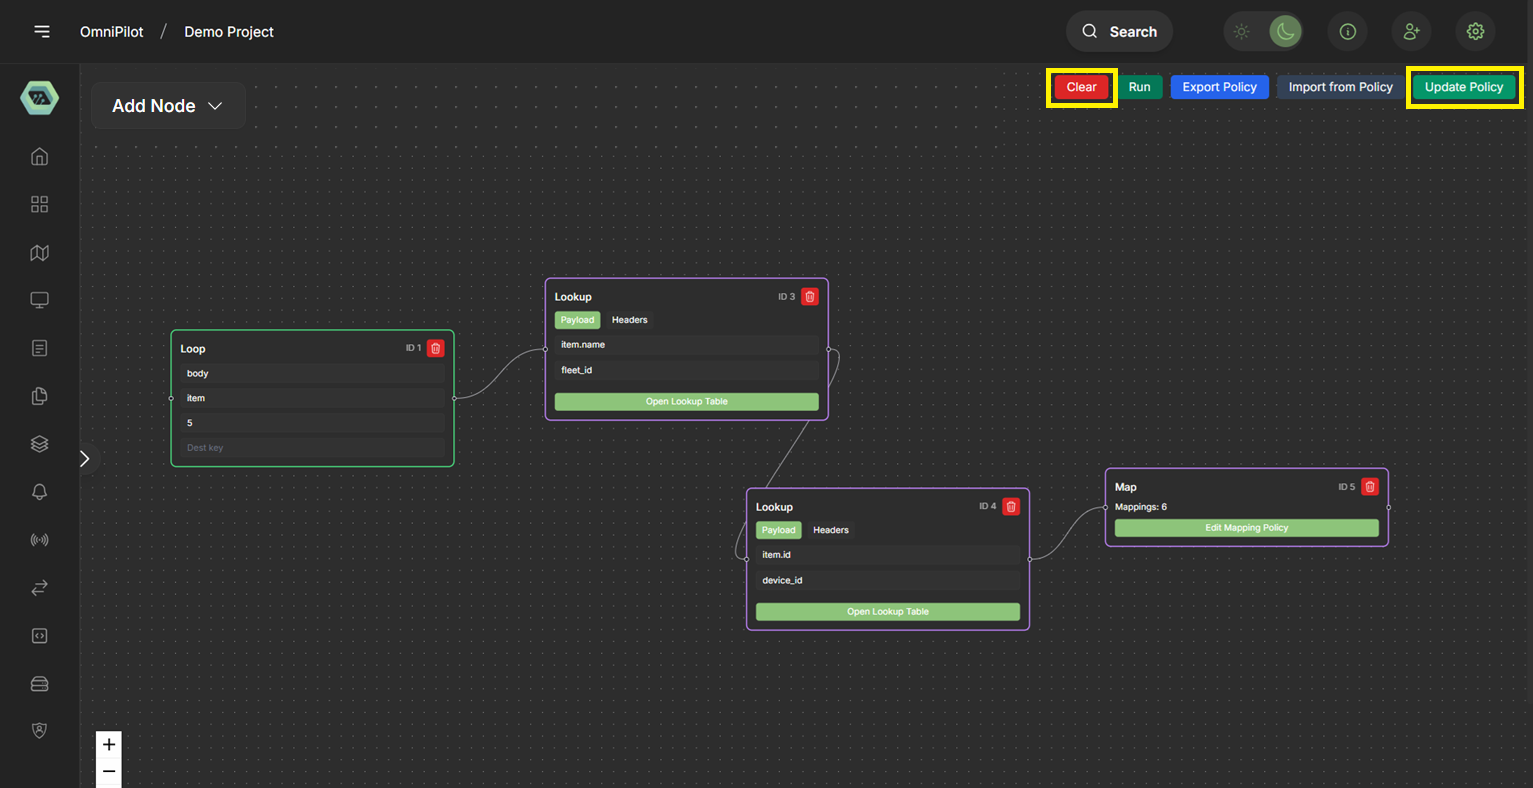
3. Clear Policy and Update Policy
- Click the "Clear Policy" button to clear the policy workflow
- Click the "Update Policy" button to update the policy workflow
Summary
This comprehensive guide has walked you through the complete process of:
- Creating a new connection to external data sources
- Testing the connection to ensure it works properly
- Building a data processing policy using various node types
- Configuring lookup tables for ID mapping
- Creating and mapping data points for data transformation
- Running and testing policies to validate workflows
- Managing policies with export, import, clear, and update features
Key Features Covered
- Connection Types: Support for MQTT and HTTP connections with comprehensive configuration options
- Connection Management: Create, test, and manage external data source connections
- Advanced Configuration: Timeout, retry, and compression settings for robust connections
- Policy Editor: Visual workflow builder with drag-and-drop node configuration
- Data Processing: Extract, loop, lookup, map, save, and split operations
- Policy Testing: Run/test policies with real-time node-by-node results
- Policy Management: Export, import, clear, and update policy workflows
The connections feature provides a powerful way to integrate external data sources with your platform, enabling real-time data processing and transformation through configurable workflows. This comprehensive system allows you to build sophisticated data pipelines that can handle complex data transformations and integrations.